Announcement

Collapse
No announcement yet.

Berlinetta build and restoration

Collapse
X
 
  • Filter
  • Time
  • Show
Clear All
new posts

  • Re: Berlinetta build and restoration

    I did think about a tie bar so after these comments I will fit one. The bracket is bolted through the original top mount and so is not totally reliant on the weld, which would definitely not be strong enough without the bolt.

    Comment


    • Re: Berlinetta build and restoration

      I made a couple of tie bars to provide extra support for the new seat belt mounts. I used 25 x 4mm flat bar and bolted it through the damper mounting post in the boot.

      20171011_211954-1632x1224.jpg

      Comment


      • Re: Berlinetta build and restoration

        Fuel filler cap. The original cap has seen better days.

        1751.jpg

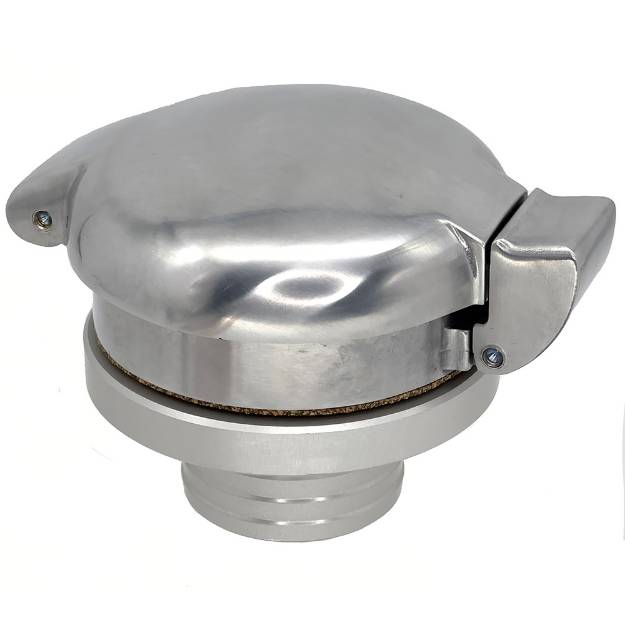
        I never really liked this cap, the large rubber grommet looked rough and the latch was a bit hit or miss. So out with the old and in with the new.

        1756.jpg

        It required a larger hole, and also may need some filler as the panel is curved. It has a lock on the inside, my main worry not being theft but jokers dropping things in!

        1761.jpg

        A length of ultra flexible fuel filler hose connects it to the tank. The original tank had the filler on the side and had a right angle bend, which made it a pain to fill. The new tank has the filler on top. I may fit a partition in the boot to protect the hoses and battery from anything sliding about and hide them from view.

        1766.jpg

        Comment


        • Re: Berlinetta build and restoration

          really nice and neat...what is it called..I want one!

          Comment


          • Re: Berlinetta build and restoration

            I got it from CBS, just be sitting down when you see the price!


            I liked how it was a complete assembly, usually you buy the cap then find a neck followed by a lock. I also liked the slip ring to hold it in place rather than have to drill holes for small bolts or screws.

            Comment


            • Re: Berlinetta build and restoration

              Where does your fuel tank actually vent to?

              Comment


              • Re: Berlinetta build and restoration

                One of the small hoses next to the filler is the vent. The other is the return from the swirl pot. I plan to run the vent up to a point higher than the filler then down to below the boot floor, I may fit a roll over vent valve aswell.

                Comment


                • Re: Berlinetta build and restoration

                  Good idea. While we hope it won't be necessary it's always another thing not to worry about if it does go upside down.

                  Comment


                  • Re: Berlinetta build and restoration

                    My main worry is that sharp cornering may induce a syphon without the valve.

                    Comment


                    • Re: Berlinetta build and restoration

                      What tank? Are there any baffles in it?

                      Comment


                      • Re: Berlinetta build and restoration

                        The story of the fuel tank starts on page 10 of this build diary.

                        Comment


                        • Re: Berlinetta build and restoration

                          The bonnet hits the air intake. The truth is that I knew this was an issue from the start when I trial fitted the engine. I positioned the engine as low as allowed by the anti-roll bar,which runs under the sump. I am aware that there are several profiles of anti-roll bar so I made sure that I had the one that provided the most clearance. I considered removing the anti-roll bar but this did not appeal. I also positioned the engine and gearbox off center to help to give a little more clearance under the bonnet. I tried using rubber trunking to duct the air to the engine under the standard bonnet, but it was too restrictive. So the last resort was a bulge in the bonnet.

                          I'm not a bodywork person and so I have been avoiding this job for a while. I did some research online and bought some tools.

                          I started with some cardboard to work out the position of the bulge.

                          1771.jpg

                          Then two plywood templates were made.

                          1776.jpg

                          The bonnet was split into individual sections and the plywood was G clamped in position. Then using a Bossing mallet and some gentle heat from a hot air gun the bulge was formed.

                          1781.jpg

                          It was smoothed out using bodywork hammers and dollies, and perhaps it is now time for a professional to finish the job.

                          1786.jpg

                          1791.jpg

                          Comment


                          • Re: Berlinetta build and restoration

                            Great job!

                            Comment


                            • Re: Berlinetta build and restoration

                              Thanks. It was easier than I expected, I think I will have another go tonight at getting it smoother.

                              Comment


                              • Re: Berlinetta build and restoration

                                If you rub some hard soap on the alloy then heat it till the soap turns black it will anneal the alloy and make it easier to work with, as all the time your hammering it will work harden it.
                                Looks good though.

                                Comment

                                Working...
                                X