Re: Berlinetta build and restoration
My main worry is that sharp cornering may induce a syphon without the valve.


-
Re: Berlinetta build and restoration
Good idea. While we hope it won't be necessary it's always another thing not to worry about if it does go upside down.Leave a comment:
-
Re: Berlinetta build and restoration
One of the small hoses next to the filler is the vent. The other is the return from the swirl pot. I plan to run the vent up to a point higher than the filler then down to below the boot floor, I may fit a roll over vent valve aswell.Leave a comment:
-
Re: Berlinetta build and restoration
Where does your fuel tank actually vent to?Leave a comment:
-
Re: Berlinetta build and restoration
I got it from CBS, just be sitting down when you see the price!
I liked how it was a complete assembly, usually you buy the cap then find a neck followed by a lock. I also liked the slip ring to hold it in place rather than have to drill holes for small bolts or screws.Leave a comment:
-
Re: Berlinetta build and restoration
really nice and neat...what is it called..I want one!Leave a comment:
-
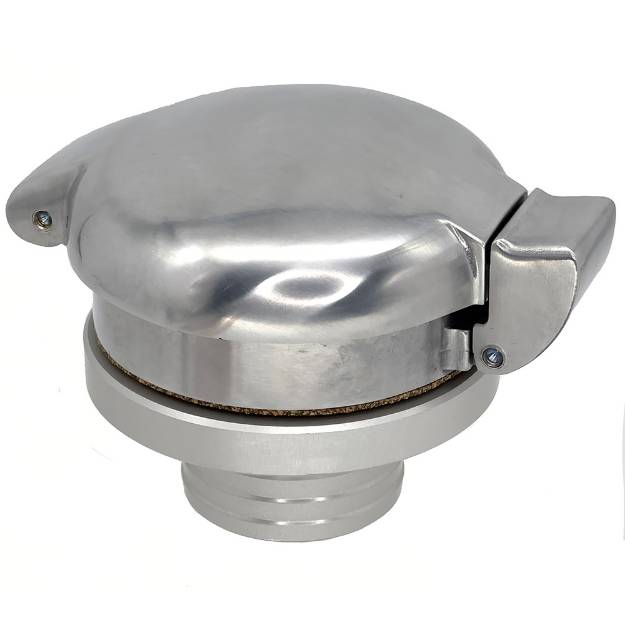
Re: Berlinetta build and restoration
Fuel filler cap. The original cap has seen better days.
1751.jpg
I never really liked this cap, the large rubber grommet looked rough and the latch was a bit hit or miss. So out with the old and in with the new.
1756.jpg
It required a larger hole, and also may need some filler as the panel is curved. It has a lock on the inside, my main worry not being theft but jokers dropping things in!
1761.jpg
A length of ultra flexible fuel filler hose connects it to the tank. The original tank had the filler on the side and had a right angle bend, which made it a pain to fill. The new tank has the filler on top. I may fit a partition in the boot to protect the hoses and battery from anything sliding about and hide them from view.
1766.jpgLeave a comment:
-
Re: Berlinetta build and restoration
I made a couple of tie bars to provide extra support for the new seat belt mounts. I used 25 x 4mm flat bar and bolted it through the damper mounting post in the boot.
20171011_211954-1632x1224.jpgLeave a comment:
-
Re: Berlinetta build and restoration
I did think about a tie bar so after these comments I will fit one. The bracket is bolted through the original top mount and so is not totally reliant on the weld, which would definitely not be strong enough without the bolt.Leave a comment:
-
Re: Berlinetta build and restoration
There was a Berlinetta builder who tried to get it through the IVA a few years back, Terry Scott I think. A forum search might find him.
As I recall the car failed on the Cortina front sub frame, but I am assuming that Terry had worked through the IVA manual and come up with a compliant seatbelt mount.
It would have been interesting to find out, I don't think he is a member now, but I guess that the IVA test was abandoned so we have no idea whether his seatbelt modification would have actually met the IVA criterea.
But I agree with Mike, the presence of a seatbelt might smooth the cars passage through an MOT test, but a poorly attached belt is a panacea to the law and is possibly more dangerous than no seatbelt at all. As I remember, unless the mountings are directly to a structural part of the chassis/frame of the car, it will be non compliant, notwithstanding the height of the shoulder strap.Leave a comment:
-
Re: Berlinetta build and restoration
Scott
In the (hopefully unlikely) event of an accident your effective body weight thrown against a seat belt is likely to exceed over one tonne, and despite how good your welding is (and it does look very good!), the leverage of your design will not cope with such an impact. A very simple bracket from the top triangulating your mount down to a secure point in the boot will solve the problem easily and effectively.Leave a comment:
-
Re: Berlinetta build and restoration
Seat belt top mount.
I wanted to raise the height of the top mount. The original mount is well below my shoulder, which not only makes it uncomfortable to wear but it would pull down rather than back in an accident. We should remember that at the time that the Berlinetta was designed, seat belt use had only just become law and were still a bit of an afterthought. I made a simple bracket for each side using 25 x 50 mm box. It is welded to the door catch bracket and bolted to the original top mount hole.
1731.jpg
Here it is painted and fitted with new seat belts. The original top mounting hole is just below the level of the window.
1736.jpg
The bracket can be easily removed by grinding off the welds if I change my mind. It will put more leverage on the original bracket, and I considered a rear diagonal tie bar but I decided that it was ok without it.Last edited by scott h; 17-09-17, 10:52 PM.Leave a comment:
-
Re: Berlinetta build and restoration
They have latches that could be modified to fit, as do other sites like Europa. However none that I have seen are anti burst with a slot for the striker, which should keep the door closed even if it deforms in a crash.Leave a comment:
-
Re: Berlinetta build and restoration
Try A (Albert or Alfred ) Jagger in Heywood lancs . they do lorry and coachwork fittings.Leave a comment:
-
Re: Berlinetta build and restoration
I spent an hour online searching for the same door latch but didn't find one. Time to move on as I don't actually need one, would have been reassuring to find one though.Leave a comment:
Leave a comment: