Re: Mike's Cabrio Build
Whoooh!
I didn't get my back boxes finished in time to fit before Donington tomorrow, but I have fitted the centre silencer and it has made a noticable difference, so I'm really pleased.
I'll still fit the two new back boxes as hopefully that will get me to where I'd like to be.
I'm really looking forward to my outing tomorrow - with hood, and without BWAAAAAAAAAAAAAH!!!!!


-
Re: Mike's Cabrio Build
Now that I have my Cabrio back from the upholsterer I am keen to stop my exhaust being so damn loud. So with Donington coming up on Saturday, I've been hard at work to have my new system ready to test on a decent run over to the show.
I ordered a set of bespoke parts from Phoenix exhausts to make up 2 new back boxes, and a centre silencer.
My original back boxes are 600mm long straight through 2" perforated pipes in 6" x 3" ovals.
As these were not reducing the db level sufficiently, I did a lot of research into silencer design, and the perceived wisdom is to go for a 3 pass chamber, flowing the gases in opposite directions to help cancel noise, and fit them into the biggest chamber possible.
So thats what I'm going for - 10"x4" oval chambers, (twice the volume, but only an inch deeper than my originals) with three perforated tubes wrapped in wire wool/glass matting in a disipative design, whilst adding resonator chambers at each end.
As I can tailor my design to suit my own car I've cut away one corner, to allow a closer fit around the rear trailing radius arm, maximising the length of chamber that will fit under my fuel tank, and will weld a flat plate across the end to close it off.
IMG_6893.JPG
Wrapped in wire wool
IMG_6894.JPG
Then in glass matting
IMG_6895.JPG
The hard part was getting the outer case on - forcing it over the end/baffle plates - a big hammer and a block of wood work wonders!!
IMG_6896.JPG
The final silencer, ready to be welded up
IMG_6898.JPG
The 2 new rear boxes double the original perforated tube length, and internal volume, but I suspect these will still not achieve the db reduction I am after, so I've made an additional centre silencer to run along the transmission tunnel to provide aditional silencing.
IMG_6899.JPG
All three silencers are straight through designs, allowing very free flowing gases, for maximum power. However, if the compromise to power is still to the detriment of too much noise, my last resort will be to add intereference type silencer boxes (such as CATs) which are very good at reducing noise, but are equally good at sapping power and fuel economy too.
I hope to get my silencers welded up tomorrow, and fitted in the evening in time to test them on my journey to Donington.
Fingers crossed they perform.......?Last edited by Mike; 28-08-14, 11:35 PM.Leave a comment:
-
Re: Mike's Cabrio Build
I have been so patient waiting for my hood, but knowing it was ready to collect, I simply could not wait until tomorrow! - its like asking a kid to wait an extra day for Christmas!
My first impressions are very good. The material and workmanship are good:
IMG_6859.JPG
IMG_6866.JPG
We have not fitted the stud fastener at the rear lower edge adjacent to the door. This will be left until I have painted and reassembled my car, so that it can be perfectly located, but even without it the fit is remarkably good.
IMG_6861.JPG
IMG_6863.JPG
I now need to learn how to fold it away neatly...... but this shot was to show the centre rail and the width of velcro tube for a quick rel;ease fastener.
IMG_6873.JPG
IMG_6868.JPG
Nice wide rear window panel - I think this is wider than the standard marlin version, which should help with visibility behind.
IMG_6870.JPG
The very sharp eyed will have noticed my catches are not complete. These are Brasscraft Cobra catches, and have no adjustement, so I wanted to wait until I knew exactly how far down to fix the hook to the windscreen surround.
I drove home with just a single G-clamp holding the front of the hood down, and was told not to go over 55mph. I tried guv'nor- honest I did, but I have to say at 70mph there was no sign of it lifting. With some foam rubber to seal the front edge, and the two catches fitted I am confident it should work very well.
See you all at Donington - I don't care about the weather now!Last edited by Mike; 23-08-14, 06:48 PM.Leave a comment:
-
Re: Mike's Cabrio Build
Whooooh!
Just had a text to say my hood is fitted and my Cabrio is ready for collection!
Will collect tomorrow, and post photos for those interested.
Quite excited as this is the last major ticket item to physically complete my car.
(Paint being only a tart up job!)
So............. what colour should I paint it?Last edited by Mike; 22-08-14, 10:37 AM.Leave a comment:
-
Re: Mike's Cabrio Build
Yup! - Not sure when I'll get it back, though I hope it is well before Donington - but I've taken so long building my car that a few more days will not hurt!Originally posted by greyV8pete View Post
But I will have to get the exhaust quietened down though........ there is always one more job!
MikeLast edited by Mike; 07-08-14, 10:38 AM.Leave a comment:
-
Leave a comment:
-
Re: Mike's Cabrio Build
So where is it? Changing colour for Donington????????Originally posted by Mike View Post Peter.
Leave a comment:
-
Re: Mike's Cabrio Build
Its a strange feeling not having a Marlin in my garage..................I've had one there for over 25 years.Leave a comment:
-
Re: Mike's Cabrio Build
Whoooh!
Vanos rebuilt, and its been well worth it on several levels.
I've had great fun stripping the Vanos down and finally understanding how Variable Valve Timing actually works - I understood the principle, but could never quite work out how it was done.
I'm pleased my engine has been upgraded to the M52's Intake Cam triple washer arrangement - (even if I was surprised to find that it had already been done in its donor days).
As it turned out, fitting the new Vanos seals was not going to make as much difference as I might have hoped - not because its not worth it - but because I'm convinced it had already had a new Vanos unit fitted recently in its donor's past. The M52 cup washer upgrade just adds to this suspicions. However, I am then left surprised by the play in the Vanos bearing - this clearly was not addressed when the Vanos unit was uograded, and has undoubtedly contributed to the "rattle" around 2700rpm.
There has been some improvement in torque at lower rpm - it now pulls better down at 2,000rpm. It is still noticable that the M50TUB25 comes alive "on cam" at 3000+ rpm.
This fits in with the general view that the M50 did lack a little low down torque, and hence why BMW introduced the M52B28 with smaller Inlet runners which restricted the top end HP to the same as the M50B25TU, but improved bottom end torque and at lower rpm too.
The biggest improvement is in engine quietness - lift the bonnet at tick-over and it is so quiet: - it has that quiet silky smooth straight 6 purr...........lovely. Under load the "Vanos rattle" noise that previously kicked in around 2,700rpm has gone completely.
The new Beisan bearing ring and tolerance instructions have proved they really know the BMW Vanos system very well.
Overall, its a definite step in the right direction.Last edited by Mike; 05-08-14, 11:48 AM.Leave a comment:
-
Re: Mike's Cabrio Build
I've had a lovely evening, rebuilding my Vanos back up - its been a long time since I've been able to have a play with mechanical items - beats upholstery and electrics any day. Quite scary though when you have to press the Vanos helical gears back into the cam shaft sprockets as this determines the timing, so one spline out could - no will! - cause problems.
The Beisan site is absolutely brilliant, showing photos of every step of the way, and it appears to have gone back together in a straight forward way.
I just hope I don't end up with any oil leaks.
Looks like Saturday will be the big day to get her going again - hopefully!
Leave a comment:
-
Re: Mike's Cabrio Build
As Forrest Gump's mother said "Life was like a box of chocolates - you don't know what you're gonna get "
Having reassembled my Vanos unit, I intended to install the M52 upgraded friction plates I'd bought - the cup/washer sandwiched between two machined plates. But when I removed my existing set up, expecting just the one standard M50 friction washer, I found it already had the M52 upgrade fitted- a big surprise!
Intake Cam M52 Upgrade.JPG
In a way I was disappointed as, with the upgrade already in place, I am not going to achieve any improvemnt here.
Then, out of curiosity, and because I had a spare solenoid on my ebay Vanos unit, I checked the operation of my existing solenoid - and surprise, surprise, it melted my test wires! A quick panic ensued as I questioned whether 12v DC was appropriate?!
Luckily the internet confirmed it does operate on 12v DC - phew!
I tested it again, and again had smoke coming off my test wires.
I then tried my spare solenoid and it worked fine.............but of course I couldn't just fit the spare, I had to find out what was wrong with the original!
To cut a long story short there was a fault in the connector on the end of the solenoid wire- the solenoid itself is OK.
So, an evening of surprises.
My vanos unit seals were in better condition than I expected.
Putting this and last night's findings together I now suspect the complete Vanos unit may have been replaced by BMW at the same time as the M52 cup washer upgrade.
(My donor was a low milage - 70k - crash damaged car with a full BMW service record, and BMW do not offer just seal replacement only).
So, my improvements are not likely to achieve as much as I had hoped for.
I'm sure setting up the Vanos bearing tolerances will have improved the smoothness/quietness of my engine, and the new seals will be marginally better, and certainly much longer lived: so not a waste of time, but not much to look forward to in terms of improved engine performance/behaviour.
However, it is likely my Vanos solenoid was not working prior to me dismantling the Vanos, which gives me great hope for a significant improvement in engine's performance: all the posts on the internet suggest a failed Vanos system makes a huge difference to torque at low revs and waivering mid range performance.
Life is full of surprises..............Last edited by Mike; 04-08-14, 12:00 PM.Leave a comment:
-
Re: Mike's Cabrio Build
Should anyone build an M50TU engined Marlin - I'll pass on a tip - be careful with the Vanos backing cap/nut!
The cap at the back of the Vanos piston is difficult to remove - for two reasons:
The 'nut' depth is very shallow, and also the cap is torqued up very tight.
A special 18mm socket with the bevelled edge removed is absolutely necessary - I tried without, and promptly stripped the corners from the nut on the right!
I then had to use a punch to start the cap unscrewing.
I bought a second complete Vanos unit for £15 from ebay, (so I now have a spare Vanos solenoid), and ground the bevelled edges flat on my own 18mm socket. I also gently heated the aluminium piston, whilst cooling the steel cap/nut with cold water: even then the socket has to be held firmly against the cap whilst rotating it, but with the heat, it will come off without damaging the nut edges.
With the new cap torqued up after removing a couple of thou from the bearing case depth, the movement in the bearing seems perfect - no axial play, while radial movement is just possible, and pre-loaded perfectly so that there is just slight resistance to rotation. All in all I am really pleased with the way it has finally turned out.
I soaked the inner seal in warm water and it went on easily. I then cooled it down in the fridge for 10 minutes, before heating and fitting the outer seal - it went on much easier than I had been led to believe.
I'll put it in the fridge prior to inserting the piston back into the Vanos cylinder to help shrink the seals and hopefully make it easy to install.Last edited by Mike; 04-08-14, 11:05 AM.Leave a comment:
-
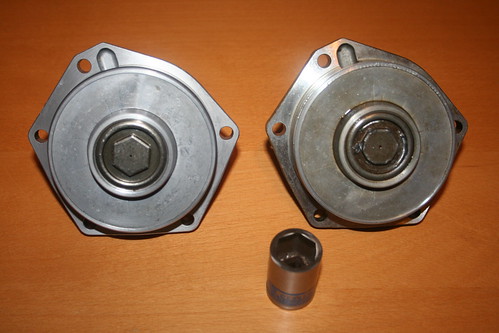
Re: Mike's Cabrio Build
Whilst I am installing the Vanos repair seals and fitting the Anti rattle ring, I also decided to add the BMW Vanos upgrade from the later M52. This is the beauty of working with BMW engines, that many of the components are retro-fitable from later models. Once again, the whole procedure is set out on the excellent Beisan Procedures site.
The original M50 Vanos arrangement:
BMW recognised that their original M50TU Vanos had oscillation resonance issues caused by the cam lobes acting on the valve/springs, so introduced an improvement on the M52:
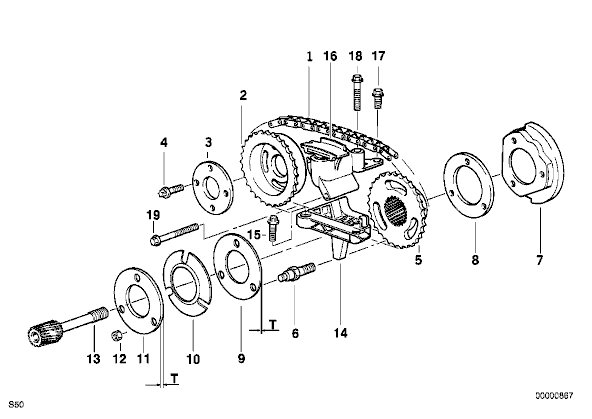
BMW added a cup washer/spring (No.10) between two flat washers (Nos.9 & 11) to dampen this oscillation.
This presumably worked well, as all subsequent BMW Vanos heads now have this three washer arrangement.
It is a fairly simple retro -fitable upgrade to the M50, requiring the three longer studs, (No.6), and the three plates, Nos 9, 10, and 11.
IMG_6511.JPG
The cupwasher/spring plate costs less than £4 from BMW, so I bought a new one, but the other two plates are machined to a high tolerance surface finish so BMW ask over £30 each!
I bought a pair of these plates from a BMW dismantler for just £10. As they do not wear, they are as good as new.
I am not sure if all these Vanos changes will noticeably affect the performace of my engine, but I am very hopeful it will quieten down the under bonnet engine sound and get back to that lovely BMW straight 6 purr!Last edited by Mike; 28-07-14, 11:39 AM.Leave a comment:

Leave a comment: