Re: Mike's Cabrio Build
Altough generally pleased with my Audi A4 seats, I was niggled by the side air bag outline showing through the leather where I had tried to hide them, so I've had an upholsterer prepare them properly, by removing the air bags completely, and filling the void with various types of foam, and a scrim layer on top, before refitting the leather casing. They look much better now.
IMG_5042.jpg
Before I went over to collect my seat I made a pair of rear quarter panels out of thin aluminium sheet, and covered them in a dense foam: these will be covered in the remaining leather I have left over from the seats and other panelling.
IMG_5041.jpg


-
Re: Mike's Cabrio Build
Hi Mike,
Looks like a good bit of kit .
Danny.Leave a comment:
-
Re: Mike's Cabrio Build
Its amazing what a holiday can do............started fitting my diff this morning at 5.45am!
Offered up,bolted in and prop shaft fitted by 7.15am.
All torqued up and complete by 9.15am (I needed some breakfast in between!)
I hope this will not move around, nor transmit too much noise/vibration:
IMG_5037.jpg
IMG_5034.jpg
Changing the diff and making a new rear carrier to replace the standard Ford D mount has been quite a lot of extra work, but I am pleased I've done it.The 3.14 diff, with the tyres I've chosen, exactly matches my donor BMW gearing, and the carrier will significantly reduce the amount of diff rotation in both planes, compared to the poor Marlin use of the original Ford D-mount. (In the Sierra the diff is supported in the long rear tube/cradle, with widely spaced fixing points, and used the D mount to support the whole of the rear end of the Sierra, making it much less prone to allowing diff rotation) By comparison Marlin's diff cradle fixings are much closer, and the rear mount has no suspension load on it, making it prone to allowing significant wind up under load.
This may all sound theoretical, but the limited clearance I have in my narrowed transmission tunnel has made it very real, and absolutely necessary.
There is not a lot of clearance around the standard Marlin transmission tunnel arrangement around the propshaft / diff U/J.............
IMG_5040.jpg
..........or to my tunnel and fuel lines!
IMG_5038.jpgLast edited by Mike; 14-09-13, 02:45 PM.Leave a comment:
-
Re: Mike's Cabrio Build
Ok - I'm back from a lovely touring holiday around the Loire region of France, and am more determined than ever to make the trip in my Cabrio in the future, so off we go again on the final run in to the IVA test, and all that that entails.............
Sometime prior to going on holiday I'd bought what appears to be a good 3.14 diff. These were only fitted to the very early diesel Sierra's (fitted with the Peugot engine) and are now old, and very rare.
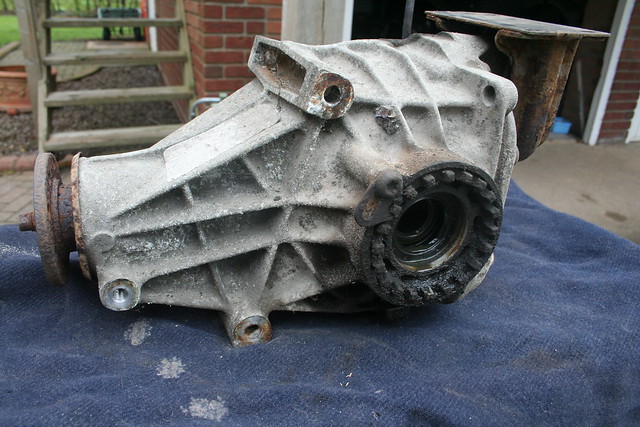
I'd power washed it, had it checked over and new seals fitted by John at Kit-fit, but it bugged me it did not look as good as my 3.38 diff that I had sand blasted myself:
So, while on holiday I decided I would get it cleaned up before fitting it in my car, and this is the result: looks almost good as new............ I'm quite chuffed with how well it has cleaned up compared to when I collected it.
3.14 diff sand blasted clean .jpg
3.14 diff sand blasted clean (1).jpg
It won't work any better of course, but I feel a lot happier about the prospect of fitting it back on to my car.............
With the newly strengthened rear diff support, its now ready to be bolted back in .
IMG_5030.jpg
Hopefully with a four point support fixing arrangement - two widely spaced at the front, and two more spaced apart at the rear, there will be little diff movement, even under hard acceleration, whilst the four rubber mounts will prevent too much noise and vibration being transmitted into the chassis.
The time is getting closer where I'll soon be able to tell......!?!
IMG_5033.jpgLast edited by Mike; 13-09-13, 12:05 PM.Leave a comment:
-
Re: Mike's Cabrio Build
Latest new part...............
IMG_4731.jpg
Sue has finally started to take an interest in my Cabrio (blimey, I must be getting close to finishing.....!).
We are going to France tomorrow for 10 days, so she decided to invest in a cool box, but only if it fitted in the Cabrio and we could use it next year on our first 'Tour de France' Cabrio style. It fits nicely behind the passeger seat, so I need to add another power point for it, or lose my Satnav socket.
She has more faith in it than I do to be expecting to go next year..............!
..........no more updates for a fortnight, but when I get back I hope we can anticipate some significant progress!Last edited by Mike; 31-08-13, 04:00 PM.Leave a comment:
-
Re: Mike's Cabrio Build
Fog Light Control Switch
IMG_4725.jpg
.............doesn't look much for £40.00 does it?
But, I have to have it to pass IVA, and it looks easy enough to wire in.Leave a comment:
-
Re: Mike's Cabrio Build
GOD! Cheers MIke. When did that change?Leave a comment:
-
Re: Mike's Cabrio Build
Simple push button, momentarily activating -> latch and a back feed to unlatch when h/l's off? I'll give it some thought later! - may have an r/c thingy that could be adapted!
TLeave a comment:
-
Re: Mike's Cabrio Build
Just when I thought the finishing line was in sight, the IVA rules on the Foglight switch have changed.
Previously the rear fog was only allowed to be on when the main lights (dip/main beam) were on - not with the side lights. This was easy to achieve, taking +ve from the main/dip circuits to the fog switch and out to the light and earth.
Now the rules state that when the mains are switched off, and then back on again, the rear fog must not come back on again inadvertently: ie it must be deliberately switched on again.
This is not a simple circuit to solve - I thought a simple latching relay would work, but then I can not switch the fogs off without switching the main off !
The only answer I have come up with is a kit from Cartek:

This video demonstrates the controls perfectly:

It's easy to install.
The only problem is its £40 including switch and p&p!Last edited by Mike; 28-08-13, 08:29 AM.Leave a comment:
-
Re: Mike's Cabrio Build
Picking up on your air flow comment Peter, I may fit some carpet loosely down the side of the heater - it will help keep the IVA man happy covering sharp edges on the heater.
(note I've added a photo in post #134)
If I choose to fix the carpet along its bottom edg to a stand off bracket, creating a deliberate gap from the transmission tunnel top, it could act as an airflow curtain, allowing it to disperse the air flow deeper in to the footwell.
This is how Simon Gregory finished off his foot wells.

I may try and do something similar.
What have other Marlin owners done in the foot wells? And where is the heat required?
Regards
MikeLast edited by Mike; 15-08-13, 02:18 PM.Leave a comment:
-
Re: Mike's Cabrio Build
Originally posted by greyV8pete View Post
Hi Peter
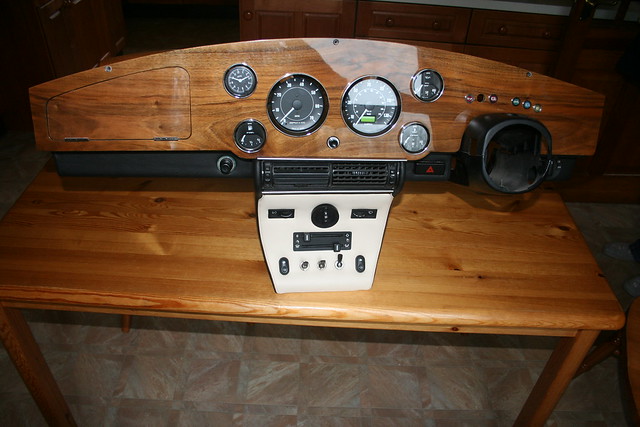
The thought did cross my mind, but I decided that if I needed a duct to take the heat away from our legs, it will be above the transmission tunnel and face forward to force air around the front of the footwell as I have fitted a centre duct to make use of the Sierra's rear facing centre vent:
IMG_4707.jpg
The aluminium plate is only there to hold the oval plastic ducting at the right height to fit the dash - its impossible to offer the dash up and hold it in place at the same time!
 Last edited by Mike; 30-08-13, 01:08 PM.
Leave a comment:
-
Re: Mike's Cabrio Build
Hi Mike. Good to see the finishing straight (almost) in sight!Originally posted by Mike View Post
You wil need to put some form of elbow / deflector on the sawn off heater ducts or you and the passenger will get fried legs! I have the unmolested Sierra ducts and had to put a duct tape patch over the outermost holes (temporary fix 3 years ago!) so solve the problem. I had an idea to duct a thin flat pipe under the leg area (like the later Sierras used for the rear passengers) but so far haven't got around to it. Maybe worth considering before you carpet / felt the floor? Peter.
Leave a comment:


Leave a comment: