Re: Finally...............
I think the wait was worth it. She looks beautiful! and I love the colour. Well done. Liz


-
Re: Finally...............
Stonking job Mike, you must be very proud.
I am now in your position, setting targets I haven't met.
Like you it needs to be done to my satisfaction and that's that.
Happy motoring and hopefully at some point I can proudly say finished.
AdrianLeave a comment:
-
Finally...............
Rebuilding your car after it has been painted is a completely different experience to dry building it unpainted. All the fettling has been done (theoretically), but you are constantly in fear of scratching it!
Much to Sue's chagrin, I brought the doors into the kitchen to rebuild them:
"..... but its the only place in the house where I have a flat clean surface to work on dear!"
[IMG]
Nearside Door Complete by Mike Garner, on Flickr[/IMG]
And of course there were upgrades I just HAD to do:
[IMG]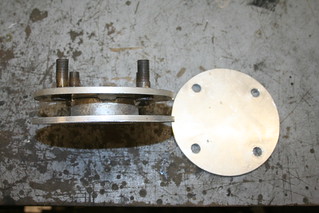
Spare Wheel Support Mk2 by Mike Garner, on Flickr[/IMG]
Those of you with a long memory will recall a super-heavyweight spare wheel carrier made from three brake discs which worked fine but weighed a tonne! I could not bring myself to re-fit it, so I've turned three discs from some thick aluminium sheet I had lying around, welded them together, and the result is 2kg lighter!!
There is a pattern of behaviour becoming apparent here...........
[IMG]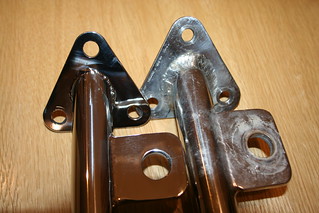
New Headlamp Bar - Self made to a higher standard by Mike Garner, on Flickr[/IMG]
It has bugged me for a long time that the 25+ headlight bars I've made and supplied to various MOC members (mostly Roadster) have been far better quality than the one I bought from Marlin 11 years ago - so I just had to make up a jig, and make my own headlamp bar for my Cabrio.
Just compare the welds........
The other major panel fit job is getting the boot lines to fit parallel and to a consistent width. I had spent hours adding body filler to the boot lid to get it to fit flush, and fitting brackets under the drip gulley that control the height of the boot rim, but again it took me hours to locate the boot hinges at the right height, with the right shims to get it to fit perfectly.
Then I had a little play: I like the styling of the Sportster, and am/was contemplating fitting Sportster bumpers instead of the large Cabrio version:
What do you prefer?
[IMG]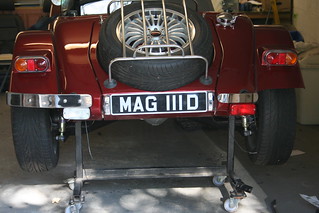
Bumpers : Cabrio Vs Sportster? by Mike Garner, on Flickr[/IMG]
Finally, at 2.30pm on Saturday 20th August 2016, (an hour and a half later than we had planned to set off for Liverpool to stay with friends before going to Tatton Park) my Cabrio made its Home PAINTED debut......................
[IMG]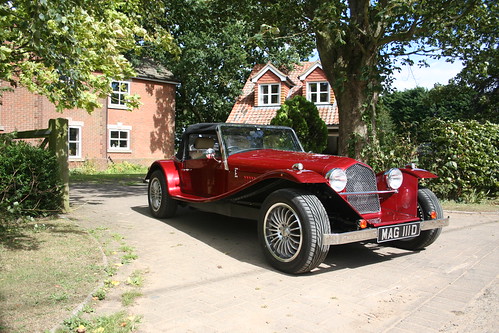
Finished! by Mike Garner, on Flickr[/IMG]
[IMG]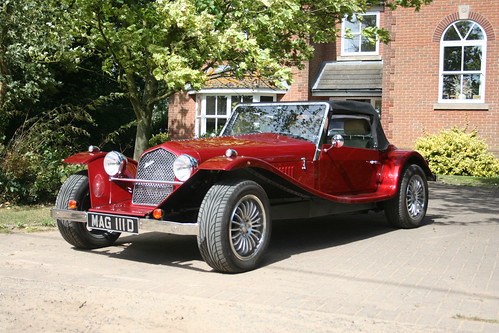
Making Its Home Debut by Mike Garner, on Flickr[/IMG]
[IMG] Making its home debut............................ by Mike Garner, on Flickr[/IMG]
Last edited by Mike; 23-08-16, 06:05 PM.
Making its home debut............................ by Mike Garner, on Flickr[/IMG]
Last edited by Mike; 23-08-16, 06:05 PM.Leave a comment:
-
Re: Mike's Cabrio Build
As my old man used to say "If a job's worth doing it's worth doing right!".
Well done with the cliff hanger ending as well!Leave a comment:
-
Re: Mike's Cabrio Build
If I had a pound for every time I've been asked when my Marlin was going to be finished................
Even I was beginning to be embarrassed by the oft repeated answer..........."Next year"
So this year I decided a deadline was needed, so I set it for Stoneleigh in May.
And missed it!
The next Marlin Owners Club event would be Castlecombe Kit car and Classic day in June
And missed it!!
As my job involves planning projects and meeting contractual deadlines with severe penalty clauses you would be forgiven for believing that I could manage my own Cabrio build programme, but alas, its a case of "A cobbler and his shoes....."
But, after 11 years even I could see this was getting beyond a joke, so the MOC stand at the Passion for Power Classic Car Show, Tatton Park on Sunday August 21st became a serious and determined deadline.
I reckoned that I had 4 weeks to do it, so I would take a week off work to get it built, and then have plenty of time left for a shake down before setting off on a 400 mile round trip.
Well, of course it didn't go like that. I had the week off, and, as planned, I worked very hard on my car - but my attitude to building my Cabrio has been all along to build the best car I am capable of building. So, after a week I had taken on the unplanned task of stripping the chassis of loose paint (plenty of it down to bare metal) and given it the full POR15 rust treatment (degreaser, rust prevention, POR15 paint, and a Chassis Topcat paint to protect it against UV light: and had a new windscreen fitted as I'd crack my second screen somehow!
[IMG]
Marlin Powder Coating - Worse Than Useless! by Mike Garner, on Flickr[/IMG]
[IMG]
Marlin Front Bumper - Powder Coating At Its Best.........Not! by Mike Garner, on Flickr[/IMG]
[IMG]
POR15 To The Rescue by Mike Garner, on Flickr[/IMG]
[IMG]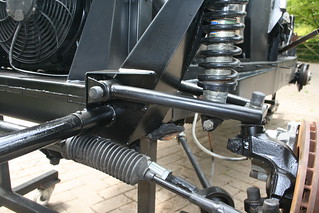
Chassis Completely Re-Painted by Mike Garner, on Flickr[/IMG]
Whilst I had the chassis up on stands it also made sense to fit my new bargain off ebay - a 71/2" Sierra 3.36 Limited Slip Diff.
[IMG]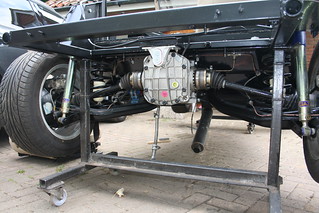
Chassis & Suspension Painted / Brand New 71/2"LSD Installed by Mike Garner, on Flickr[/IMG]
I also managed to fit the nose cone, bulkhead /bonnet cover, and the bonnet panels - top and side. I had taken hours setting up my panel gaps before painting, fettling edges and making fixings to ensure my panels would all go back to give a perfect finish.
Wrong!
The nose cone can move up and down a few millimetres , the hinges can move side to so side too, and together they have a huge impact on the panel gaps. It took hours to get right again!...............but it had to be right.
[IMG]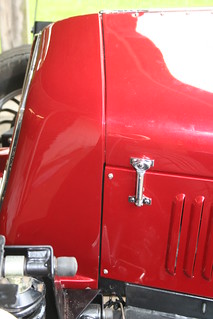
Nose Cone Fitting by Mike Garner, on Flickr[/IMG]
To control the A-panel position I've altered the shape of the windscreen surround where it meets the A-panel, and welded a splice plate to it that sits in a slot in the A-panel: so when in their final position the two edges are parallel and flush in all planes.
[IMG]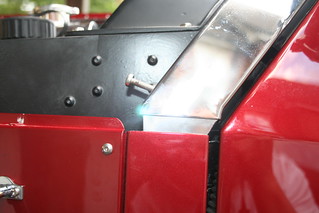
Windscreen / A-Panel Spliceplate by Mike Garner, on Flickr[/IMG]
[IMG]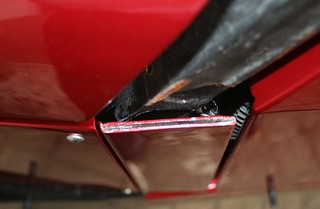
A-plate Modified by Mike Garner, on Flickr[/IMG]
So, by the end of the week I had half of the panels back on my car!
Two weeks of late evenings - (due in part to the Olympics as well !) - and I was getting closer, but my car certainly did not look like it would get to Tatton Park in just one a weeks time! I could not miss yet another deadline........ could I?
As luck would have it my work projects have run serenely to programme, so I was able to devote a significant part of the following week to pushing it through to completion.
And so, finally, after 11 years, I can proudly present my "finished" Cabrio.................. sorry work calls and they will have to follow later!Last edited by Mike; 23-08-16, 04:42 PM.Leave a comment:
-
Re: Mike's Cabrio Build
It is no longer Silver/Deaf Aid Biege - its not anything really as all the panels are painted, but still to be rebuilt.
One of my New Year's resolutions was to go to more cars shows, (and by implication, in my Marlin Cabrio) so I made the effort to go to Castle Coombe Classic and Kit Car show and Track day.
As I have failed to meet yet another deadline to have my Cabrio completed, I at least showed willing..................
Castle Coombe 2016 (B&W).JPG
..............my nose cone made it
Leave a comment:
-
Re: Mike's Cabrio Build
Are we nearly there yet?..............Originally posted by cameronfurnival View Post")
Not long now Cameron.
I've been told the panels are all painted and are due to be polished tomorrow. I hope to collect some parts later tomorrow afternoon.
Although I took them all in one vehicle, I dare not risk trying to cram them in painted to get them back home!
Family duties over the weekend will stop me from playing with my nice new shiney panels over the Bank Holiday weekend..... Doh!
Leave a comment:
-
Re: Mike's Cabrio Build
we must have some news on this by now Mike - I have been waiting here for months!
Leave a comment:
-
Re: Mike's Cabrio Build
Same situation here - was going to be metallic blue - but who knows --- new audi R8 orange looks cool !!Leave a comment:
-
Re: Mike's Cabrio Build
Nope!Originally posted by Peterx View Post
I've been outside several times this week holding out sample colour cards trying to decide which one............
Out of the 4 sample cards I have, I've picked three of them that were "Definitely this one"........... only to change my mind later in a different light!!
To be fair, I probably know the colour, just not the shade, or mix (metallic/pearl effect etc?).Leave a comment:
-
Re: Mike's Cabrio Build
Hi Mike,Originally posted by Mike View Post
made up your mind yet??
I think this coulour scheme looks very classy.....
pr1_cabrio_blue_moors_m1b.jpg
cheers, PeterLeave a comment:


Leave a comment: