Announcement

Collapse
No announcement yet.

DRL152K Marina based roadster rebuild

Collapse
X
 
  • Filter
  • Time
  • Show
Clear All
new posts

  • #76
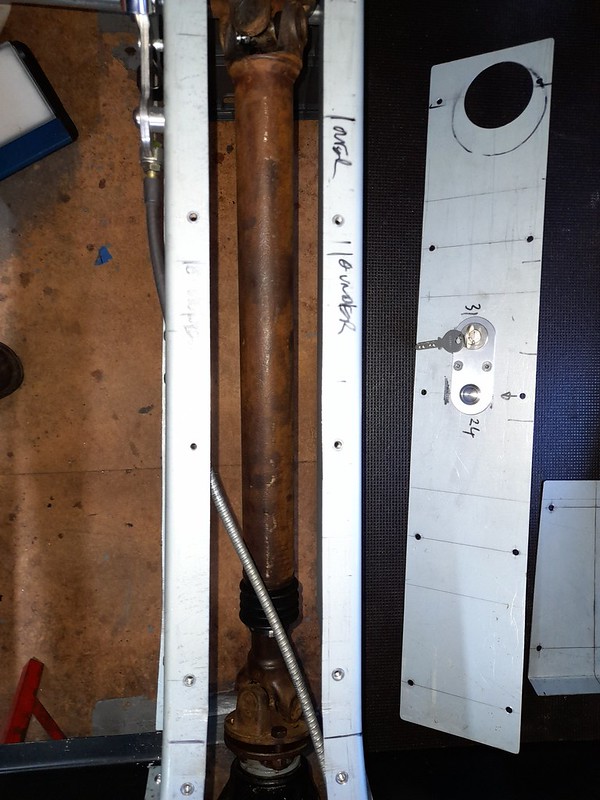
    Today I completed construction of the dashboard blank. I made it from one of the bonnet side panels which I am replacing as they are full of holes in the wrong places. And I thought it would be cool to incorporate at least some of the old panelwork! As it is over 40 years old it comes with a pre-patinated finish which I think I might leave.
    Difficult to see from the picture but I formed a radius on the lower edge using a mould and a small rubber hammer. And there is a 20x20mm re-inforcing angle running the entire width at the top.
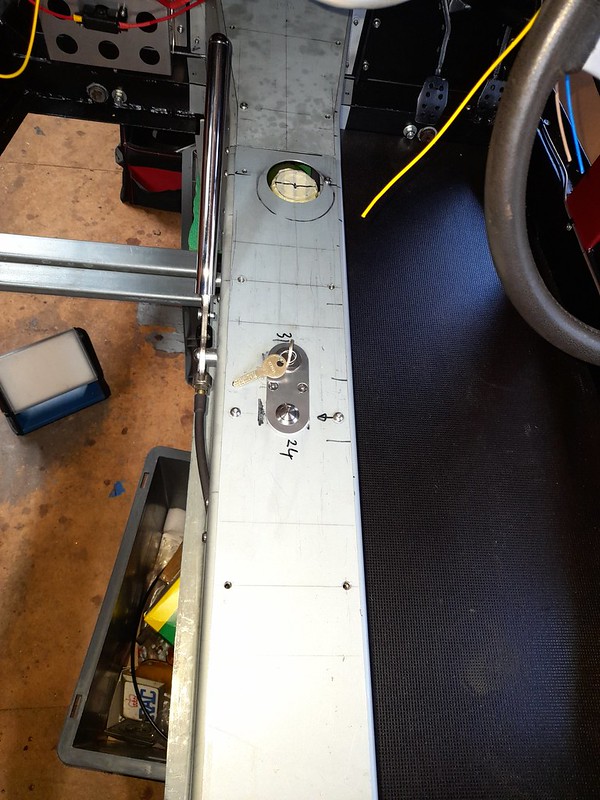
    The plan was to use some s/h Smiths gauges but as they are almost as expensive s/h as new nowadays so I think I will buy some new ones. Just water temp and fuel level are all I intend to use.
    Now comes a question for anyone who still looks at this forum. I have several toggle switches to mount on the left in the blank area, and several indicator lights to mount on the right in front of the steering wheel. Should they be in a horizontal line, or should they follow the line of the scuttle top and slope upwards? Hmmm...
    dashboard2 by Robin Martin, on Flickr​

    Comment


    • #77
      1 vote for sloping

      Comment


      • #78
        I also vote for sloping

        Comment


        • #79
          I vote for sloping also.

          Adrian

          Comment


          • #80
            Looks like it's sloping then

            Comment


            • #81
              Yes, seems like the right choice
              Mk2 SWB Marina Roadster with a 2.0L Pinto built in 1986

              Comment


              • #82
                As suggested I have made everything line up with the scuttle top. I am still not convinced though ;-)
                dashboard3 by Robin Martin, on Flickr
                The little rectangle of masking tape immediately in front of the steering wheel represents the tiny digital (bicycle) speedo I am using. Not very "classic" but practical and cheap! And removable.
                I have been trying not to buy any parts with the classic car label as it seems to add a premium to the cost. But the Lucas trafficator switch you can see is perfect for the job. I can operate it without removing my hands from the steering wheel as per the IVA rules and - well - it looks the part. I don't need an IVA as the car is already registered, but I consider the rules to be a good guidline where practical.​

                Comment


                • #83
                  I think it looks brilliant, I wish I had thought of doing that when I did mine.

                  Adrian

                  Comment


                  • #84
                    Originally posted by listerjp2 View Post
                    I think it looks brilliant, I wish I had thought of doing that when I did mine.

                    Adrian
                    Thank-you - but I have to confess it wasn't 100% my idea. As with many things it is just a refinement of what somebody else already did.

                    Cheers, Robin

                    Comment


                    • #85
                      I have been looking at this post and your progress for a long time and have picked up lots of ideas from your posts which I will incorporate in my newly restarted build as I will need to get my Marlin though IVA cheers Phil

                      Comment


                      • #86

                        I have been pondering the problem of my propshaft for some time now. For some reason the little screwed cap that holds the oil seal on the splined joint is way to big and hence impossible to screw up. I can only think that it has come loose at some point and years of rattling arround on the propshaft joint has stretched it. Its at least 3mm too big in diameter.
                        propshaft_problem by Robin Martin, on Flickr
                        Anyway I was doing some routine maintenance on the Pembleton. The driveshafts (2cv) have 3 joints the centre one of which is a sliding spline like on a propshaft. They are all protected by rubber gaitors. So I got out the callipers and, would you believe it, the size of the shafts making up the splined joint is almost the same as that on the Marlin propshaft. Getting excited now... So I ordered a gaitor from ECAS, the main source for 2CV spares and it fits perfectly!
                        propshaft_solution by Robin Martin, on Flickr
                        Not very often you get a piece of luck like that.

                        Edit/Delete Message

                        Comment


                        • #87
                          Very useful that these fit but surely this doesn't resolve your issue of holding the oil seal in place? Regardless of putting on a gaiter I would expect you would still need a correctly fitting oil seal.
                          2000 Marlin Cabrio LWB; 2.0 L Burton Pinto in Ford Nightfire Red with Magnolia leather interior.

                          http://www.marlinownersclub.com/wppg...&image_id=2349

                          Comment


                          • #88
                            I probably didn't explain it well!
                            There wasn't really an oil seal in the conventional sense. The splined joint is greased. The original arrangement was just a primitive cork washer the job of which was to keep the grit out and the grease in. I think the gaiter should do the same job. It works well on millions of 2CV's!

                            Comment


                            • #89
                              Makes sense now.... Can't beat a good 2CV, have owned a couple over the years. Cornering is a riot and a case of trusting the car to not do a Reliant Regal on you!
                              2000 Marlin Cabrio LWB; 2.0 L Burton Pinto in Ford Nightfire Red with Magnolia leather interior.

                              http://www.marlinownersclub.com/wppg...&image_id=2349

                              Comment


                              • #90
                                I thought it was about time to do a reality check and make sure the gearbox actually fitted in my new transmission tunnel. I had to take the hacksaw to one of the unused lugs on the gearbox casing but now it fits with about 1/2" clearance on either side which hope is enough for any movement. And the propshaft fits as well, always a bonus....
                                gearbox_fit1 by Robin Martin, on Flickr
                                propshaft_check1 by Robin Martin, on Flickr
                                From the front it looks like I may have to adjust the position of the fuel line but I'll wait untill the gearbox is finally fitted before I do that.
                                gearbox_fit2 by Robin Martin, on Flickr
                                And I have taken the advice of various sages and fixed the tunnel top using M5 screws and rivet nuts. I have put the ignition switch on the top of the tunnel, the idea being all of the wiring is then almost impossible to get at for any would be joy rider. The switch itself is an industrial tamper proof item. NOS from ebay for a bargain tenner.
                                transmission_tunnel by Robin Martin, on Flickr
                                And yes the gearbox is almost new! It looks like it had been recently fitted before I bought the car from the previous owner and builder.​

                                Comment

                                Working...
                                X