Announcement

Collapse
No announcement yet.

Mike's Cabrio Build

Collapse
X
 
  • Filter
  • Time
  • Show
Clear All
new posts

  • Re: Mike's Cabrio Build

    Hi Peter

    Technically you are correct, as my Cabrio shows a date of first registration as Feb 2014.
    However, my suffix D plate is from 1966 when number plates were made in this style:so it it is a bit of a mute point.
    Given the style of car (1930s running boards etc), and the year of the plate, I think it would be a very picky policeman who would prosecute on such a technicality.

    Mike

    Comment


    • Re: Mike's Cabrio Build

      Originally posted by Mike View Post
      Hi Peter

      Technically you are correct, as my Cabrio shows a date of first registration as Feb 2014.
      However, my suffix D plate is from 1966 when number plates were made in this style:so it it is a bit of a mute point.
      Given the style of car (1930s running boards etc), and the year of the plate, I think it would be a very picky policeman who would prosecute on such a technicality.

      Mike
      I agree but be aware a MOT tester should check the correct plates are fitted so I'd say have a spare set of the correct items for that IDC.


      Paul H

      Comment


      • Re: Mike's Cabrio Build

        Originally posted by Mike View Post
        Hi Peter

        Technically you are correct, as my Cabrio shows a date of first registration as Feb 2014.
        However, my suffix D plate is from 1966 when number plates were made in this style:so it it is a bit of a mute point.
        Given the style of car (1930s running boards etc), and the year of the plate, I think it would be a very picky policeman who would prosecute on such a technicality.

        Mike
        Hi Mike. I think the D reg suffix is a red herring. It’s the date of first registration of the vehicle that counts. Have a look at he folowing link. Not sure a possible £1000 fine is worth the gamble . Peter.

        Comment


        • Re: Mike's Cabrio Build

          Hi Mike
          Excellent news you are on the road I can not really add a lot about your black and silver number plates but I ran round with similar plates on my car and never had any problems and that was on a Q plate even puting it though a mot it was never brought up, but at that time I did have a sympathetic mot tester. When I get my car on the road I was going to go with the same plates and have some reflective modern ones made up for the mot and to keep in the car and if any one questioned them I would produce said modern plates and say I had forgotten to put them back on after a car show.
          If you want a drive out you are welcome to pop round to see me and there will be hot drink waiting for you to warm up with.
          Angus

          Comment


          • Re: Mike's Cabrio Build

            A very important day................

            As any attached Marlin owner knows, keeping your other half happy with 'The Marlin' can be marginal at times.........so today was a very important day - pay back time.................. I have finally been able to keep my promise to 'Take Sue out for A Day in the Marlin when its built!'

            I was a little dubious as to what sort of reaction it would get - picking a cold day in mid February, and without a hood, was hardly the best way to win her over.

            IMG_5862.jpg


            IMG_5860.jpg

            But, encouraged to wear plenty of warm layers of clothing, she seemed happy at the prospect...............

            IMG_5865.jpg


            photo (1).jpg


            After the violent wind and rain of Friday and Saturday the forecast was for a sunny day in Lincolnshire, so we planned to travel over to Easton Walled Gardens, just outside Grantham, for their Snowdrop week.


            IMG_5882.jpg

            It has been a glorious day today. Bright sunshine - perfect Marlin weather - we were well wrapped up - and the heater is great - and arrived without a hitch. Its strange parking up, and going through the routine of getting out of the car and , opening up the boot to store valuables away ( a scene I have watched so many times at various Kit Car shows).
            It was stranger still to get out of the Cabrio and be removing clothes on a cold day to then go for our walk around the gardens!

            IMG_5884.jpg

            So, finally, after 8 years waiting, Sue got her day out...................


            And I'll let Sue have the final word on her first day out in 'The Marlin':

            Twenty four years on from starting his first Roadster, and eight years on from building this Cabrio I was delighted to get a day out in it!
            It was very exciting, rattled a bit but drove brilliantly, the sun shone and with my travel rug, hat and sunglasses on,we went over to Grantham. The garden was glorious, the coffee and cake excellent and the jouney 'refreshing' but exhillarating. I'm certainly up for lots more 'days out'.
            Mike has taken a lot of stick from the family while building this; from me for spending so much time in the garage; and from our son, Ben, who said "I hate this car, whenever I have to help I end up with my head stuck down behind the seats in an impossible position, in a freezing cold garage!" But.... he has stuck with it and ended up with a car he is justifiably proud of, and we are very proud of him - eventually!
            There is still quite a lot of work to be done, but we will all perhaps be a little more positive in encouraging him to get it totally finished.
            As with everything in life, he always makes a 'proper job' of it; so to my determined, intelligent and hard working husband I say a very big 'Well done!'
            Last edited by Mike; 16-02-14, 08:00 PM.

            Comment


            • Re: Mike's Cabrio Build

              I have followed the "Build" with interest, strange that the first trip out "for her indoors" was to see Snowdrops. After I bought my Roadster, which had been Sorned for 3 years, we went over Exmoor to see the Snowdrops at Wheddon Cross near Dunster. That was 3 years ago and we have been to see them each year since, except this year so far, as we have the floods this way. Mind you we have gone out to see them in the past, passing piles of snow alongside the road.
              I feel this is what it is about owning a Marlin, using it come what may. Last Wednesday I had to take mine for a retest as the Vertical link had needed changing, and that was the day we had the bad storm. I needed wipers on the inside of the screen!!!!!! We cannot use the hood, too tall, too large, but we wrap up and enjoy it, towel over legs.
              Well done Sue and Mike for keping up the "Snowdrop Outings".
              Hopefully article being written for Pitstop on Triumph Herald new vertical links!!!!!!!
              David.

              Comment


              • Re: Mike's Cabrio Build

                Mike,

                Many congratulations. What a great day. That first run out, with a good few miles covered and a good run back, with the car not letting you down and nothing falling off is a day to be savoured.

                Enjoy........................

                And here's to many more days just like it. The rain MUST stop soon!!

                Nigel

                Comment


                • Re: Mike's Cabrio Build

                  Hurrah, just when the weather is perking up. Cool plate too.
                  It might be a bit late to say but I got Millie’s number plate from an internet company for £21. My wife managed to wash her number plate clean off the car in the storms a couple of weeks ago. The replacement cost about £18 for just the front one from a high street retailer.
                  Paul

                  Comment


                  • Re: Mike's Cabrio Build

                    Just when you think you are beginning to see the light at the end of the tunnel.............

                    My best mate came over from Canada last week, so my wife suggested I took him out for a ride in my Marlin - "The one that I've always been building!".

                    It was very cold but that was no problem for Brit - he lives in Calgary where it is currently -20C and 10 feet deep in snow! So with thick jackets on we set off.

                    Reverse was a little difficult to select as I backed out of the garage, but I put that down to the cold................ bad idea.

                    As we drove it quickly became worse, and after only 2-3 miles..............it completely failed: foot to the floor, with no opening of the plates. One of the benefits of a 6 cylinder 2.5 engine was that I could limp it home in 4th gear, and coast it onto our drive.

                    ................and the final embarassment?

                    Brit had to get out and help push it back into the garage.

                    Whoever said "Pride cometh before a fall" certainly had it right!


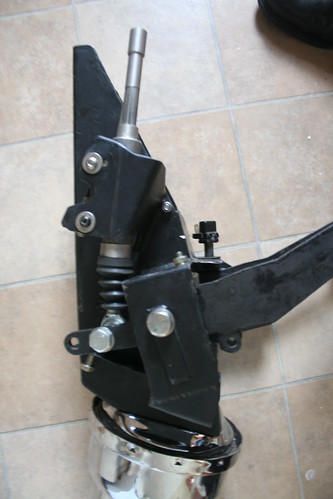
                    A quick check at the weekend has shown it to be the clutch master cylinder. I have bent the push rod, and can only conclude I have either over stroked the slave cylinder so that the fluid could be pumped no further, and/or the geometry of the cylinder relative to the arc of the pedal is not quite right?

                    Its not an expensive fix - £21 for a new master cylinder delivered, but jeepers, the work required to get at it!!! It took two hours to get my entire pedal box out, after disconnecting accelerator cable, brake servo, hydraulic feed pipe, brake warning light switch, and remove the steering column!

                    The bloke who built it certainly made a good job of installing it, but clearly gave little thought to running repairs/maintenace afterwards!!!

                    Comment


                    • Re: Mike's Cabrio Build

                      Glad to hear you've found the cause - happy fettlng to fix - at least it'll be good r when summer arrives

                      Rgds DC

                      Comment


                      • Re: Mike's Cabrio Build

                        My bruised ego is slowly healing...................


                        I have fitted a new master cylinder, after fettling the fixing holes to try to align it with the pedal arc.

                        Comment


                        • Re: Mike's Cabrio Build

                          Pedal Box Improvements: Version number.......I've lost count. Marlins's pedal box really is a poor piece of engineering.

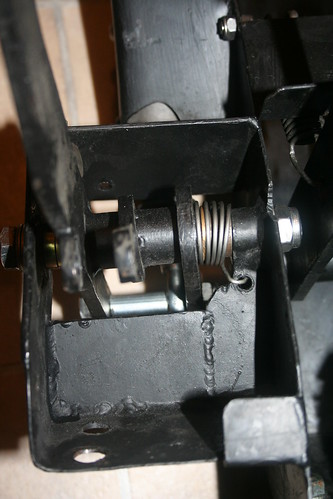
                          After realigning the clutch master cylinder, I decided to add a torsion return spring to the clutch pedal to help ensure the master cylinder refilled with a complete charge from the reservoir each time it was released.
                          I looked for ages amongst my parts bin for a suitable torsion spring, and then found one fitted to the BMW throttle body butterfly. I cut and bent the ends, and it works perfectly.


                          To prevent the push arm sliding laterally, I've inserted a spacer tube between the two clutch push arms.

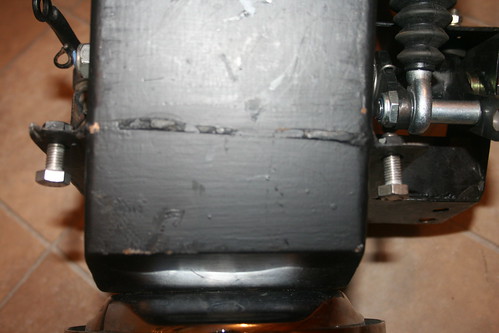
                          Another small effort, but major improvement mod has been welding two nuts to the pedal box for the top fixings to the fire wall. It was a right PITA to try to get access to the nuts to remove the pedal box. Now it will be really easy to tighten a bolt in the top ones from the firewall side.
                          (thoroughly recommend this upgrade - unless you like lying un your back with head in footwell and legs up in the air!) swearing every time the socket falls off while trying to get it onto the nut.


                          When repairing anything I do like to make improvements - if I only restore it to the way it was I feel its been a complete waste of my time.

                          So, I have made a couple of other improvements:

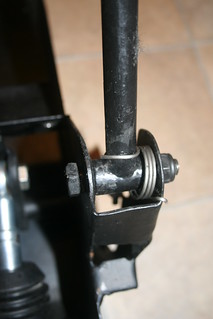
                          Adding a similar torsion spring to the accelerator pedal, this will make it easier/quicker for the butterfly to close when my foot is taken off the pedal, rather than relying on the throttle body spring only.


                          The brake servo mount creates an offset with the angle of the brake pedal. Originally I fitted a clevis between the servo and the pedal, and elongated the hole in the pedal to accommodate the offset. Later a fellow member suggested a rose joint would be better, and I totally agree, so I took the opportunity to fit one.
                          This photo below shows the offset, and a rose joint is perfect to accept an offset angle, and be tightened up fully to the pedal.

                          Last edited by Mike; 13-03-14, 08:30 PM.

                          Comment


                          • Re: Mike's Cabrio Build

                            Quick update.

                            Pedal box is now fully re-installed. The welded nuts meant it was a much easier one man job to fit . The only difficult part was bleeding the BMW clutch slave cylinder: what a rediculous design - the bleed screw is at the bottom of the cylinder. Where does air go - to the top , so it is impossible to bleed while still fitted to the car. So I had to remove the slave cylinder, then make a plate to keep the master clinder push rod compressed in: then rotate 180 degrees, so that the bleed nipple faced upwards: two strokes of the clutch pedal was plenty to clear the air out.

                            The clutch pedal now has a nice feel to it, very smooth, not at all heavy, and clears fully with only 1/2 - 2/3 pedal travel. Perfect.
                            I definitely need to make a physical stop for the pedal, as I found that if a gear is difficult to select (ie reverse when cold), without realising it, I have a tendency to press the clutch pedal down further whilst trying to make the gear selection - this could explain why/how I damaged the original master cylinder!

                            Hopefully the addition of return springs on all three pedals will improve all of their operations in the longer term too.

                            The brake pedal has a nice feel to it too, but I will need more time out on the road to test if it has been a total success.

                            Although it has been a pain, I am pleased with the changes I have incorporated .

                            Next project - get a hood made/fitted to cope with these pesky hail showers we keep experiencing!
                            Last edited by Mike; 24-03-14, 03:16 PM.

                            Comment


                            • Re: Mike's Cabrio Build

                              Never believe what you are told..................nor make assumptions!

                              When I bought my Cabrio kit, Marlin had only built one demonstrator using the BMW M50 engine, and sold one kit to a builder. In order to fit the engine width in the engine bay they had both cut 3" out of the width of the entire inlet manifold, requiring 6 individual inlet tubes to be cut, sleeved and joined. So, although I was nervous about doing it, I accepted the perceived wisdom of the time, and did the same.

                              Inlet manifold Cut and Sleeved

                              IMG_1847.JPG

                              Although I felt I had made a good job, I always had a niggling doubt that this could prove to be its Achilles Heal - making the engine unreliable sometime down the road.

                              Several years later Jeremy created a solution to the issue in his Sportster by fitting the intake boot back to front, trimming it down where it fits to the throttle body, and facing the boot back towards the bulkhead. Very simple, very cheap, and the two ports to the ICV and sump faced downwards - perfect.
                              I began to wonder if the same might be possible in a Cabrio?
                              Initially I assumed the Sportster engine bay was bigger than a Cabrio - I always felt it looked wider.

                              But, never make assumptions................!

                              Over time, talking to Danny Nelson, and seeing other Sportster builders achieve the same solution I began to ask about Cabrio/Sportster similarities, and asked for comparative measurements. I have come to understand the original Ford based Sportster shared the same chassis as the Sierra based Cabrio, and though it has undergone bulkhead and rear end changes to accommodate different BMW donor rear subframes, the front chassis/engine bay still shares the same original Cabrio DNA.

                              So, maybe this meant I could use the same solution as the Sportster builders? It was an intriguing thought, but was going to involve some serious engine surgery just to even find out, so I held the thought until after IVA.

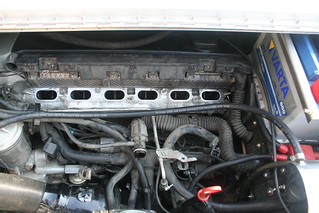
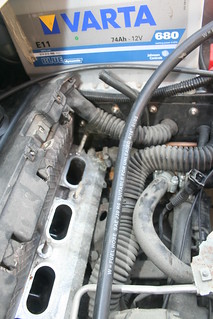
                              Well, this weekend I finally took the plunge. I had been prompted by a very small water leak under my bell housing, which I had traced back to somewhere under my inlet manifold, but was impossible to get at unless, and until, I removed the inlet manifold.

                              Another factor was that I was not happy with the cobbled up Smiths sender I had been obliged to fit to make my standard Smiths Water Temperature guage work, as it was too short and didn't extend deep enough into the waterway.

                              So, with three jobs to do, off came the inlet manifold!


                              Once removed the culprit for the water leak was soon located (the rear head water port)


                              At the back of the head is the port which feeds the internal heater, and the rubber pipe had not sealed properly despite the jubilee clip being tight.
                              This was easily resolved by fitting a smaller diameter piece of rubber hose.

                              Whilst the manifold was removed I changed the water temperature sender back to to the original BMW VDO sender: this will have to be connected to a new Smiths Classic VDO based guage.


                              It's the sender on the right of the two - the blue one on the left is the engine management temperature sender which feeds into the ECU.
                              I had to buy a new Smiths VDO guage to match the BMW VDO sender, so there is a knock on to all this which means the dash will have to come out again to replace the water temperature guage: oh the joys of kit car building!!

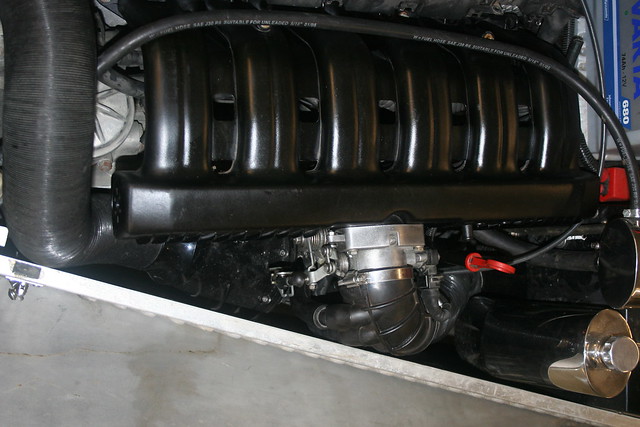
                              Once these two minor jobs were done, the moment of truth had arrived - could I fit a full width inlet manifold and keep it all within the width of my engine bay?


                              ............and the answer is, Yes........... JUST!

                              By fitting the inlet elbow back to front, and trimming it down to the bare minimum where it fits the throttle body, it just fits. This is exactly how it had worked out in the Sportsters - very very cosy, but just possible.

                              I am delighted, as this means I can now run my engine normally with a standard inlet manifold.
                              One of the things I am hoping for is that the torque curve will be shifted back down the rev range a little with the longer inlet runners: only time will tell?

                              (I do have two other changes in mind which will have an impact on the torque curve of my Cabrio, but they will be have to wait).

                              I didn't get a chance to put all my pipe connections back on this evening so have not had the chance to run my engine yet - I'm looking forward to that almost as much as the first start, as this will hopefully be the final engine configuration for this year, and will give me a lot more peace of mind.
                              Last edited by Mike; 31-03-14, 09:50 AM.

                              Comment


                              • Re: Mike's Cabrio Build

                                Whilst I have the Inlet manifold off........yes it is still off - long story to be told later - I have addressed another little niggle.
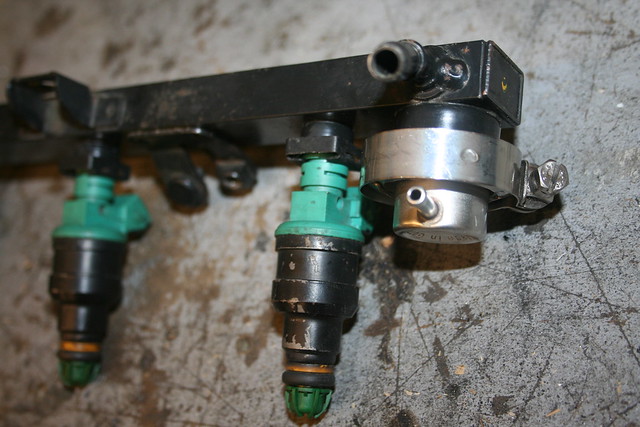
                                Ever since I connected my fuel system up I've had an odd noise rather like bubbles of air rattling along a pressurised pipe
                                Although I did establish it was not my pump, nor fuel supply lines to the engine bay I never have determined the exact cause.
                                This evening I tested the fuel lines upto but excluding the fuel rail - no noise. Ah ha! So it is likely the problem was a faulty fuel rail pressure regulator. I have changed it for a spare I had, and have high hopes of both solving my strange noise, and hopefully improve the engine's performance - fuel injectors need to be pressure fed to work properly, so mine may have been suffering? Combined with my "new" full length Inlet manifold runners, I'm hopeful my engine will feel much stronger.

                                Comment

                                Working...
                                X