Announcement

Collapse
No announcement yet.

Mike's Cabrio Build

Collapse
X
 
  • Filter
  • Time
  • Show
Clear All
new posts

  • Re: Mike's Cabrio Build

    Progress has been even slower than usual - but its been lovely having the family back home for Christmas and New Year.

    The parts for my exhaust have been ready for a while, but I've been waiting for my friendly stainless welder to be free to get them welded up. Well finally they are done and fitted:

    Copy of IMG_7215.JPG

    Now that they are polished up and fitted at the right height they do not look as bad as I feared - I still prefer the twin straight tail pipes out of the centre rear, but you can't always have everything. Ground clearance is still pretty good - as Marlin's go - as I raised my tank 25mm higher than the manual suggests when originally installing it.

    The good news is they are much quieter than the originals, but have retained the silky 6 cylinder burble, so on the sound front I am very pleased: I' ll have to get my Db meter out and see how they compare to the originals.


    Copy of IMG_7214.JPG

    Unfortunately I will have to wait for some nicer weather before determining whether the re-positioned tailpipes has cured the exhaust fumes from rolling back into the cabin - I can't get my hood down as our local farm roads are covered in mud and puddles deep enough to float a boats, meaning I get drowned in muddy water each time I hit a puddle a speed ( ........a lesson I learned the hard way during my early road tests!).
    Last edited by Mike; 08-01-15, 11:37 AM.

    Comment


    • Re: Mike's Cabrio Build

      I have a similar problem with fumes in cabin the attached is closest I can find of a CFD run on a similar shape car as you can see a lot of turbulance but nothing suggesting flow into cabin. I am wonder if a gap between the boot lid and boot floor (due to how it opens is the entry source as lot of turbulance in that area.

      Enjoy the videos and music that you love, upload original content and share it all with friends, family and the world on YouTube.

      Comment


      • Re: Mike's Cabrio Build - C2c - The Great Smokie Run

        Some time ago Keith Howell floated the idea of an East - West Marlin relay from Lowestoft to St Davids for fun and to raise funds for the Parkinson's charity. I volunteered for the 2nd leg from Thetford to Roxton, St Neots. Keith put a tremendous amount of work into planning the route and timings, and made sure it would all run smoothly. It did, and I wish to record my thanks for all his hard work.

        I'm sure there will be several fishermen's tales to be told of the Marlin Great Smokie run 2015 - not least by Mark Westbrook-White in is MGB powered Roadster who lost two forward gears and reverse, but managed to complete two legs and more than 100 miles.

        My own tale was in getting to the start line. I've long had a tiny petrol weep from either the tank outlet, or the union to it - so I thought I'd tighten it before setting off on a 180 mile round trip....... not a good idea - I twisted the union off in the tank, which meant stripping it out of the car to make a repair!
        OK, so, look for what is good - I had also wanted to change the diff back to my earlier 3.38 from the 3.14 I was currently running, but felt was over geared.

        So less than 24 hours before I was due on the start line of the 2nd leg of the Great Smokie run I had my Cabrio up on its stands with the exhaust , petrol tank, and diff removed.......

        IMG_7387[1].JPG


        IMG_7388[1].JPG

        I welded the aluminium union back on to the tank, and set about changing my diff. I thought I had better have a quick look inside the diff before re-fitting it

        IMG_7390[1].JPG

        The crown wheel and pinion looked good, and it was certainly a 3.38

        - But I wished I hadn't opened it up - it was full of bright silver flakes, not the more usual dark iron filings - I didn't know what they were, and I did not have long to decide what to do. I rang John at Kitfit, who refurbishes a lot of Sierra diffs, and really knows his Ford running gear - he told me it was likely to be the chrome plating from the planetary gears, and suggested if it ran smoothly to put it back in, though it may whine.

        Cleaned up, re-built and showing the special double rear mounting I made to limit the wind-up of the diff compared to the very poor original Sierra D bracket

        IMG_7393[1].JPG

        12 hours after I started, at 9.30pm, and less than 10 hours before I was due to set off for the Great Smokie run I was ready to lower my Cabrio down from its stands.


        IMG_7394[1].JPG

        - coming from a farming background has its advantages - the best car lift ever!


        IMG_7396.JPG


        IMG_7397.JPG
        Last edited by Mike; 06-06-15, 09:58 AM.

        Comment


        • Re: Mike's Cabrio Build

          As a postscript, my diff held up fine on the Great Smokie run: 185 mile round trip and it ran beautifully - no oil leaks; great. Also, touch wood, I appear to have finally cured the very slow petrol weep I had around the outlet of my tank. So all in all a successful, if stressful days work.
          The higher ratio diff is certainly a better match for the power band of the M50 engine, allowing the revs to climb a little higher taking it into its power band.


          Meeting at the first handover - Kilverstone


          The second handover at Roxton
          Last edited by Mike; 06-06-15, 10:23 AM.

          Comment


          • Re: Mike's Cabrio Build

            Its been a while.....................

            Now that I've had my Cabrio on the road for a while and had the opportunity to cover some miles I have found myself making a mental list (quite long!) of the little things I want to alter/improve.
            As so often happens when you have a long list, I have given it a lot of thought, but not managed to start any of them!

            So, I decided I should prioritise them, and then set to work. My list came out as:

            Improve the ride - it is too hard
            Attach the exhaust on better hangers to prevent the bounce rattle when going over significant bumps
            Fit a tighter window guide in the rear of the door to reduce side screen rattle
            Fit some rubber pads on the roof frame to stop the side screens rattling against them.

            Make changes to the bodywork - to allow it to be painted
            I want to fit an Aston fuel filler cap, which requires the rear tub to have the fuel filler indent removed and glassed over flat to allow the Aston fuel filler flange to sit flush.
            I also want to remove the Sierra/Cortina door handles which have never struck me as appropriate for the style of car the Cabrio is, to the older style T handles.

            Have my Cabrio painted!
            Once these are complete I can satisfy a lot of other MOC members expectations that I should get my car painted - even if I still do not know what colour it is going to be!!!!

            So, to work................

            #1 Ride Quality
            Since getting on the road I've found my Cabrio suspension to be far too stiff.

            Research has told me the rear springs on Sierra saloon's are all the same, whatever the engine or model (estates had stiffer springs). Therefore if other Cabrios have softer rides maybe it was down to the standard rear shock absorbers being too stiff. Peter Licence and others have suggested that adjustable shocks help.
            I bought and fitted a pair of GAZ adjustable shock absorbers to go onto the rear to match the front ones supplied by Marlin, and this did improve the rear end, but it still felt too stiff.

            This left only the front suspension - and logic suggested there were probably bigger variations here among cabrio set ups, as the coilovers supplied by Marlin certainly varied over the years - either intentionally, or otherwise!!

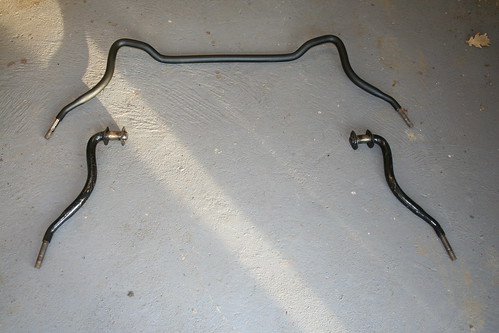
            When Marlin supplied my kit originally, those readers with good memories (very good memories as it was 10 years ago!) will recall, they returned my standard 28mm Sierra Anti Roll Bar in two pieces, to be used as solid compression struts only.

            Marlin's chopped up ARB!


            I was deeply unhappy with the way they expected these struts to attach to the chassis - with the centre removed, it relied on two large penny washers welded to the strut to be held in place by the Sierra's soft D rubber bushes: not a well engineered sloution - so began a journey of discovery into Sierra ARBs.

            There are at least 3 different diameters of "standard" Sierra ARB 24mm, 26mm, and 28mm, and at least two very different shaped centre cranks.

            By luck I found that the smaller diameter 24mm ARB also had a crank which moved away from my BMW engine's sump under suspension compression as well as offering a softer ride. And this was how I put my Cabrio through IVA.

            However, now that I've driven it some distance I was still not happy with my car's ride, and began thinking about the possibility of fitting softer coilover springs on the front - but the trouble was I didn't even know the spring rate of those on my car, let alone what rate I should move down to. And at around ÂŁ200 a pair for special springs I was reluctant to embark on a process of trial and error.

            At the same time two other thoughts had refused to go away - setting up my Cabrio's standard suspension was going to be a very crude trial and error process, almost impossible to fine tune accurately. I was also aware Simon Gregory felt the handling of his cabrio was transformed by a professional wheel alignment set up after he had fitted his adjustable compression struts.
            Also, could it also be that Marlin had supplied me with coil over springs that were better suited to work without an ARB? I know this requires a leap of faith as it is Marlin we are dealing with, but the appeal of adjustable compression struts making the suspension set up so much easier had a lot going for it.

            The flip side to these thoughts was - would removing the ARB introduce body roll, and the compression struts generate vibration back into the chassis?

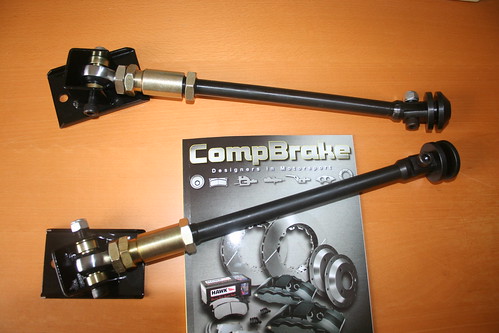
            In the end I decided it was an educated risk, and worth taking the leap of faith to invest in a pair of Compbrake's adjustable Compression struts.


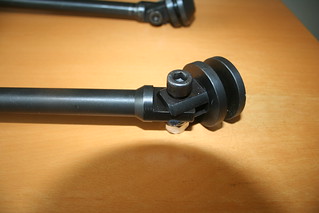
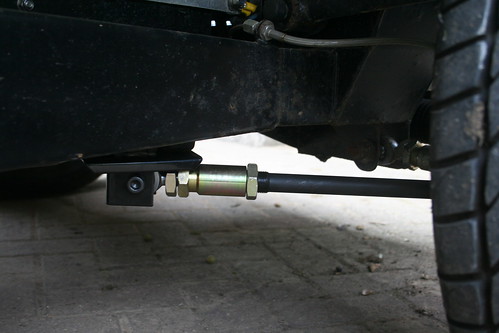
            The quality of these struts is very impressive. They are CNC machined - not welded - and appear to be very good.


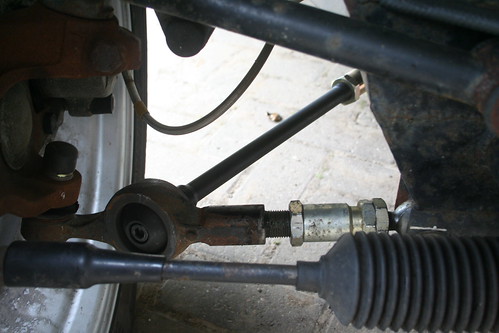
            Initially when I offered the new struts up to the TCA I thought I had a problem. The fixing bolt in the Compression strut end for the TCA is only 25mm long: but the rubber compliance bush in the TCA is 40mm front to back.


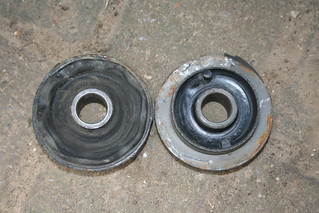
            An internet check then showed me that the standard rubber bush had to be removed, allowing the strut to hard fix steel to steel inside the TCA.

            This concerned me greatly. I was already concerned that the solid rose joint mounts to the chassis would introduce vibration into the chassis, and now found the compliance bushes in the TCAs had to be removed, leaving no compliance bushing at all.

            Removing 'the bush' from each of the TCAs was easy when I discovered it was not a single solid bush, but was infact two thin halves with a void between.


            I began to realise why there is so much talk about Sierra TCAs being able to move under braking, and hard cornering, and how it adversley affects handlling!
            Two thin sheets of rubber allow the TCA to move considerably.


            The holes in the Compbrake strut brackets for mounting to the chassis were not the same pitch as those on my chassis - Sierra D cups have slotted holes to cope with variations on Sierra's - it would have been easy if Compbrakes had them too. However, once I had opened out the holes with a file the brackets went on easy enough.


            There is a minor snag which may prove to be an irritant - the two large adjuster nuts at the rear of the strut are too close to the bolt head securing the bracket to the chassis. The flat of the nut misses the bolt head, but the hex does not. I suspect this is not an issue on the Sierra as the bracket probably does not mount in a horizontal plain almost level with the TCA?
            It will not be the end of the world if I find they do foul under suspension movement; it will requiring the hole in the bracket to be lowered 5mm. Time will tell on this one.


            The front connection between compression strut and TCA is solid.

            Once I had worked out how they mounted, it was an easy job to install the struts.......... and then even easier to make castor and camber changes.


            I set up the suspension purely by eye, and went for a preliminary test drive, as I was concerned about vibration and harshness, and that I'd be forced to go back to the ARB, or make changes to the strut/TCA attachment to incorporate a bush of some type.


            However, I was very pleasatly surprised that there is no noticable difference in vibration: better still the ride is much softer, just as I had hoped.

            I've not driven it much yet but body roll is possibly noticable now, whereas there was non before - it was like a go-kart, but in such a low car, and with seats so close to the axis of roll, I am convinced it will not be an issue.


            Revelation
            As the castor & camber are so easy to change I had a play with various setting and went for several quick spins to assess the road handling - what a revelation!
            I had no idea how such small changes to castor, camber and Toe would impact on the handling.


            My first trip out was with the settings as close as possible to where my ARB had set the castor. The car felt very stable (I bottled out at 3 figures mph!) , but the steering was heavy at slow speeds. I increased the castor, and the self centring improved, but the tyres squealed going round a roaundabout at a very slow speed - sounded like an American movie!

            When I checked the alignment, I had inadvertently created a small degree of toe -out, and it was horrible.


            I have fiddled with the settings to get a semi - reasonable set up, but have realised that tiny variations in castor camber and toe make a huge difference to the handling, so have decided a professional dynamic wheel alignment set up is essential.


            Although it needs setting up professionally, I have seen enough, and felt enough, to know that this has been very worthwhile.

            Given the sensitivity of suspension changes to the performance of the cars handling, the idea that it would be possible to get a good set up by fitting and removing shims in the top wishbone by trial and error seems very remote.


            With the two adjustable collars, on the compression struts and TCAs, a proper wheel alignment will be very straight forward excercise. I am quite excited now to see how it handles ....................................
            Last edited by Mike; 08-09-15, 04:39 PM.

            Comment


            • Re: Mike's Cabrio Build

              Sounds like a really good modification Mike. I wonder if those struts may be a good replacement for the tie rods on a marina based roadster? Maybe not enough up/down movement though?

              Comment


              • Re: Mike's Cabrio Build

                Mike
                Any idea of the corners weights ?

                Comment


                • Re: Mike's Cabrio Build

                  Originally posted by dogoncrazy View Post
                  Mike
                  Any idea of the corners weights ?
                  Sorry Alan, I have no idea..............my local tyre shop has some sophisticated alignment kit, but not sure whether they will be able to corner weight it at the same time as my wheel aligning?
                  I'll let you know after I've had it set up.

                  Comment


                  • Re: Mike's Cabrio Build

                    I did this mod on my cabrio well worth it its in my thread somewhere

                    Comment


                    • Re: Mike's Cabrio Build

                      Here is a clue to what will come next................. Junction 10a

                      Any guesses ?????

                      Comment


                      • Re: Mike's Cabrio Build

                        M54 engine perhaps..?
                        Marlin Roadster, LWB...1860 B Series + Ford Type 9
                        Renault Espace 54mm front calipers, vented discs, cycle wings and adjustable tie-bars.

                        Comment


                        • Re: Mike's Cabrio Build

                          Originally posted by lil_red_roadster View Post
                          M54 engine perhaps..?
                          Too obvious: there is more to it than that.

                          Comment


                          • Re: Mike's Cabrio Build

                            Originally posted by Mike View Post
                            Here is a clue to what will come next................. Junction 10a

                            Any guesses ?????
                            Surely not a paint job! Track day perhaps?

                            Comment


                            • Re: Mike's Cabrio Build

                              I don’t suppose you are about to convert it into some kind of Luton van?
                              Changing a junction box fuse?
                              Variable speed limit?
                              Flyover?
                              Do we get clue 2 soon?
                              Paul

                              Comment


                              • Re: Mike's Cabrio Build

                                You're about to sell the beast and junc 10a is the exchange point?? ; - ))

                                Comment

                                Working...
                                X