Originally posted by CosworthCabrioLee
View Post


-
Re: Mike's Cabrio Build
.............with one of those foot sensors under the fuel tank to open it! -
Re: Mike's Cabrio Build
Funny you should suggest that - I did try two - and could not close the boot due to the increased spring pressure!Originally posted by cameronfurnival View Post
may be the answer is a different spring/damper, or another damper only.
I may just end up doing what everyone else has and fit a bit of leather strap!Leave a comment:
-
Re: Mike's Cabrio Build
And have it remote so as you are rushing out of the supermarket in the pouring rain you can click the button and the boot pops open to saves timeLeave a comment:
-
Re: Mike's Cabrio Build
Yes Mike - fit two struts - then an automatic release (solenoid or cable) and it will be a doddle to lift! See you at the weekend,.Leave a comment:
-
Re: Mike's Cabrio Build
Mike. There was a Berli some years ago with two gas struts on the boot. They were at the sides and seemed to work quite well. Peter.Leave a comment:
-
Re: Mike's Cabrio Build
A Nice Idea......?
Whilst rummaging around the scrap yard I came across a pair of gas dampers on a BMW bonnet, and for £2 I thought I might find them a home.
Well tonight I had an experiment with fitting one to assist opening my boot lid - there is a lot of weight in the rim and tyre.
IMG_3716.jpg
Its a nice idea, but my execution of it is not quite right. It is nicely damped, but as the lid gets closer to vertical, there is less and less weight to push against so it accelerates and throws the lid open at the end - not quite what I had in mind!
It closes quite nicely, and is nicer than with no damping at all: just a shame about the last part of opening.
Anyone any ideas how to stop the final stage of opening being over sprung?
And who guessed what the temporary bracket was made from?Last edited by Mike; 29-04-13, 10:04 PM.Leave a comment:
-
Re: Mike's Cabrio Build
Sierra Diff Conversion : Push In To Lobro
The Sierra's 7" open diff is capable of accepting either the Push - In drive shafts, or the Lobros. It is a simple task to convert the Push-In to the Lobro fitting (required for my disc brake drive shafts).
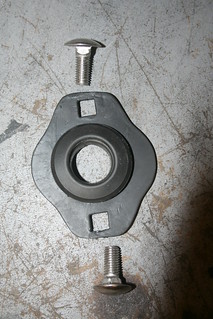
This is a Lobro drive flange. It pushes into the diff, in exactly the same way as the Push-In drive shaft fitting, but is then retained by a cir-clip. (There are 3 different thicknesses to allow for the optimum fitting).

This shot shows the Lobro drive flange inserted in the diff, prior to the cir-clip being fitted - you can just see the end of the drive shaft protruding through the star wheel.

This will be the third one I've fitted, and I haven't even got my Cabrio on the road yet!Last edited by Mike; 29-04-13, 02:54 PM.Leave a comment:
-
Re: Mike's Cabrio Build
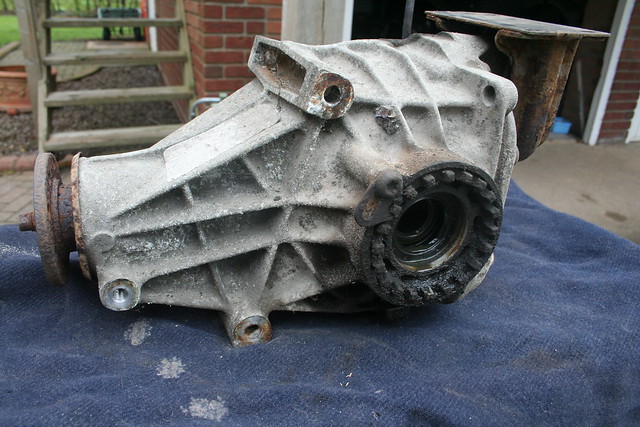
New Diff
This was not in my plan at all, but some things you just have to do!
Peter Edwards kindly put me on to a 3.14 diff on ebay, being advertised on a Buy It Now at a reasonable price (by today's market), so I bought it.
From the outset of my build I had hoped to use a 3.14 diff, as this will keep the engine revs down at touring speeds.
My BMW 325i donor had a 3.15 diff, with 205/60/15 tyres (627mm diameter) as standard.
I have chosen 215/55/16 tyres (643mm diameter, which are just +2.5% bigger), so a 3.14 diff will retain almost the same gearing as in the original donor (+3% overall).
It is a bit marginal over the 3.38 diff I have fitted at the moment, but will drop the revs from 3,200rpm to 3,000rpm at 70mph, so cruising will be a little more relaxed.
Before buying it, I checked to confirm it was a 3.14 - they are very rare now days. It had a 3.14 tag on the back: the donor had the letter 'M' in the VIN Axle box (denoting 3.14 diff), and the donor was an early 2.3 diesel (Peugot) which were fitted with a 3.14 diff, so it all checked out, and I bought it. A quick check on collection (North Wales, from South Lincolnshire!) showed it was a 3.14.
Once I had it home I have opened the back up to see what condition it is in and appear to have struck lucky - it is in very good condition. The early 2.3 diesel Sierra's were never going to cause the diff a lot of damage though were they? - They were so under powered - I know as I had a one as a company car!!
I have opened it up, and it looks very good inside:

The oil level plug (centre left) is magnetised, and has nothing of significance clinging to it, so there is no damage. What little play there is should be there to allow tolerance changes when hot.
The seals clearly need replacing, but that is a straight forward task.
I had seen other Ford diffs showing the ratio hand written on the crown wheel, and assumed this had been done by the photographer, but, no, they were marked by Ford by hand during production.

It even has the original tag with 3.14 on it:
IMG_3711.jpgLast edited by Mike; 29-04-13, 02:52 PM.Leave a comment:
-
Re: Mike's Cabrio Build
Mike I did the seats on my Roadster, and when winter arrives again going to get the Cabrio seat covers removed and embroided in blue and while I am at it I have heated seat kits to go in.
excellent Mike a great read, Anyone who wants to try the power steering conversion please see me at Stoneleigh, said it before the best mod you can do one your car....... Last edited by CosworthCabrioLee; 15-04-13, 06:02 PM.
Leave a comment:
-
Re: Mike's Cabrio Build
As this is a build diary - Happy Birthday to my Cabrio - it arrived 7 years ago!
I hope I have it on the road before it reaches the grand old age of 8 !
MikeLeave a comment:
-
Re: Mike's Cabrio Build
Hi CameronOriginally posted by cameronfurnival View Post
I'm glad a few of you are reading it, and thanks for the compliment.
How about some more updates on yours?
They are just so useful, even to other model owners - I've had a Berly builder contact me today about his dash having seen mine, and I am currently looking for a 14" Cossie steering wheel having seen your Romero's!
I have a bit more to do before booking my Cabrio in for its IVA test, but it is on the horizon at last:
Electric windows need wiring to the dash
All the dash wiring has all to be connected to all the appropriate gauges, including speedos and rev counters which will no doubt take some working out.
Then the carpets
Then all the little IVA checks, though I hope most of these have been covered as I've gone along.
Has anyone spotted anything they think will fail the IVA test?
I've had a look at the latest IVA manual on line, and I am not sure about whether my rear bumpers will meet the current regulations? The ends are supposed to be turned in towards the body, and should not be more than 30mm from the body. Mine fail on both counts, but it would be easy enough to have them bent to achieve this - they just would not look so nice afterwards!
MikeLeave a comment:
-
Re: Mike's Cabrio Build
Current Diary Build
This is my build diary brought right up to this weekend. I have fitted a rubber boot liner, and am in the process of making and fitting the rear bulkhead between the cabin and boot. As I have access to the boot via an opening lid, this is a solid panel - made from aluminium, and to be covered in leather.
IMG_3618.jpg
Incidentally I found an embroiderer who will embroider a 250mm wide Marlin logo in red on to the leather I provide for £20. Sounds good value to me.
This is what it will look like. I plan to have this centered on the rear bulkhead panel between the two seats.
Embroidered Marlin.jpgLast edited by Mike; 15-04-13, 01:47 PM.Leave a comment:
-
Re: Mike's Cabrio Build
Well done Mike - a fabulous diary! Now you just have to keep updating it as you do those last little jobs! When's IVA booked?
Leave a comment:
-
Re: Mike's Cabrio Build
And finally............
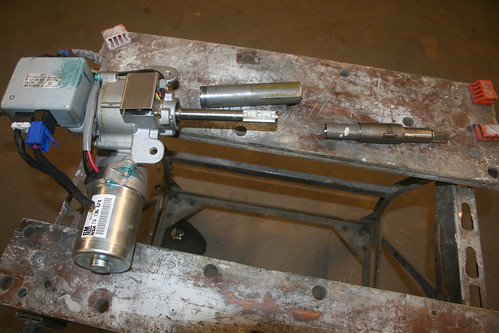
One upgrade too many. Power Steering
We live in a pampered and cosseted age. Modern cars are fitted with so many driver aids to make them easier to drive - power steering is a prime example.
Lee Hunter developed a power steering conversion fro his cabrio, and posted it to the MOC Forum. I like the idea, and have copied the general arrangement. however, I have decided not to fit it prior to the IVA test for two reasons. Firstly I am advised it reduces self centering which is a requirement of the IVA, and secondly, it is just something else they could pick up on and find issues with.
I have developed my kit ready for fitting, and will certainly try it after I gaet my cabrio legally registered and on the road.
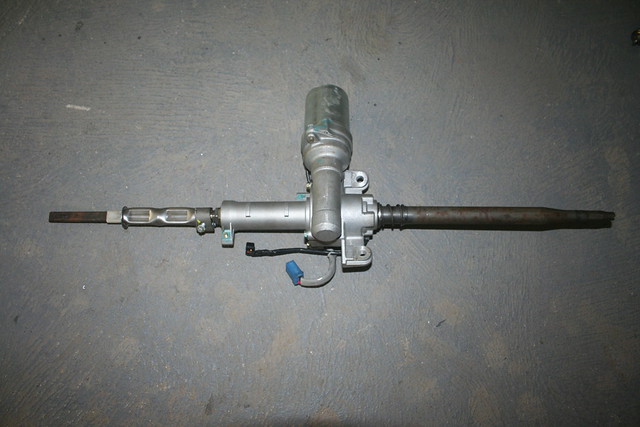
The conversion starts with a Corsa C EPAS fixed power steering column which can be picked up on ebay for around £50:

Careful stripping down reveals the central motor unit, and the upper splined shaft:
There are a number of ways to go about this, but I want mine to be totally interchangeable with my Sierra steering column, in case I do not like it, and that the Corsa's central motor section remains totally standard, allowing a replacement to be fitted if there is ever a fault.
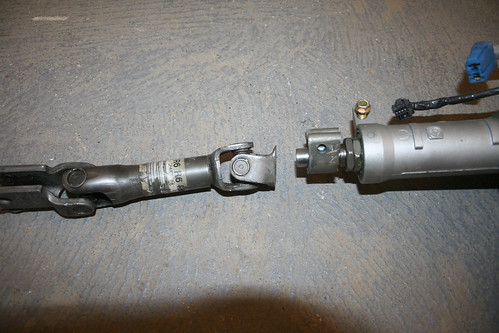
The Corsa steering system has a lower link with a spliced clamp which connects to central motor unit. I cut the Corsa's lower link from the clap, and will weld a Sierra lower sliding column back on:
With the upper column removed, the Corsa's input shaft looks like this:
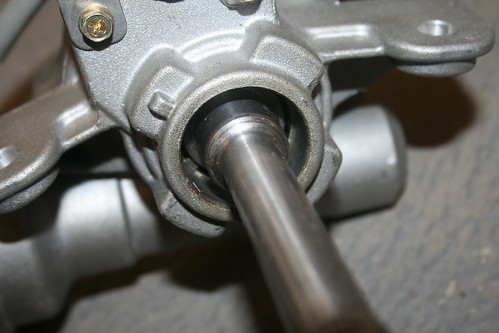
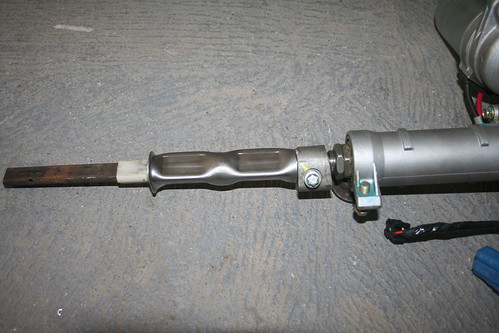
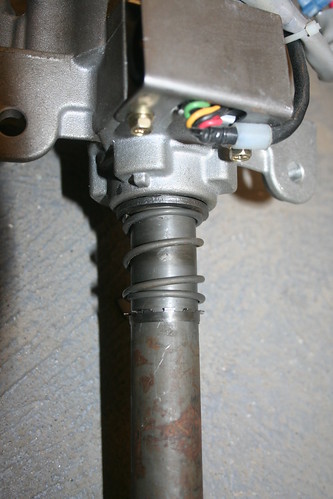
The upper Sierra shaft has to be cut off just below the collar and spring which locate it in the Sierra's upper outer column housing.

Quite by chance it will fit over the Corsa's input shaft - even the collar inside the housing.
and the final arrangement looks like this, with the Corsa motor effectively spliced in to the centre of a standard Sierra column:
I had one issue to deal with to make it fit in the space of my footwell: routed through the original steering column bulkhead hole the clapm bolt on the lower fixing just caught the brake pedal. I have therefore moved my bulklhead steering column bearing over by 10mm to clear this, and fitted a covering plate ove the extended hole.
All that is required is to change the columns over, ( slightly easier said than done, as I want to retain the adjustable column, requiring the motor mounting to be adjustable too) and then provide a power source, and a special actuator for the electronic controls which can be sourced for around £15.
This can all be done post IVA.Last edited by Mike; 15-04-13, 12:34 PM.Leave a comment:

Leave a comment: