


-
I have been looking at this post and your progress for a long time and have picked up lots of ideas from your posts which I will incorporate in my newly restarted build as I will need to get my Marlin though IVA cheers Phil -
Thank-you - but I have to confess it wasn't 100% my idea. As with many things it is just a refinement of what somebody else already did.Originally posted by listerjp2 View Post
Cheers, RobinLeave a comment:
-
I think it looks brilliant, I wish I had thought of doing that when I did mine.
AdrianLeave a comment:
-
As suggested I have made everything line up with the scuttle top. I am still not convinced though ;-)
 dashboard3 by Robin Martin, on Flickr
The little rectangle of masking tape immediately in front of the steering wheel represents the tiny digital (bicycle) speedo I am using. Not very "classic" but practical and cheap! And removable.
I have been trying not to buy any parts with the classic car label as it seems to add a premium to the cost. But the Lucas trafficator switch you can see is perfect for the job. I can operate it without removing my hands from the steering wheel as per the IVA rules and - well - it looks the part. I don't need an IVA as the car is already registered, but I consider the rules to be a good guidline where practical.Leave a comment:
-
Today I completed construction of the dashboard blank. I made it from one of the bonnet side panels which I am replacing as they are full of holes in the wrong places. And I thought it would be cool to incorporate at least some of the old panelwork! As it is over 40 years old it comes with a pre-patinated finish which I think I might leave.
Difficult to see from the picture but I formed a radius on the lower edge using a mould and a small rubber hammer. And there is a 20x20mm re-inforcing angle running the entire width at the top.
The plan was to use some s/h Smiths gauges but as they are almost as expensive s/h as new nowadays so I think I will buy some new ones. Just water temp and fuel level are all I intend to use.
Now comes a question for anyone who still looks at this forum. I have several toggle switches to mount on the left in the blank area, and several indicator lights to mount on the right in front of the steering wheel. Should they be in a horizontal line, or should they follow the line of the scuttle top and slope upwards? Hmmm...
 dashboard2 by Robin Martin, on Flickr
Leave a comment:
-
Yes - I may put a cover over the whole thing.Originally posted by jon_wilkinson View Post
But fuses blowing - Never. I'm an electrical engineer and they wouldn't dare ;-)Last edited by martinclan56; 02-02-24, 01:25 PM.Leave a comment:
-
Very neat, Robin, but your passenger is going to keep kicking that and changing fuses will be a real pain crawling into the footwell!Leave a comment:
-
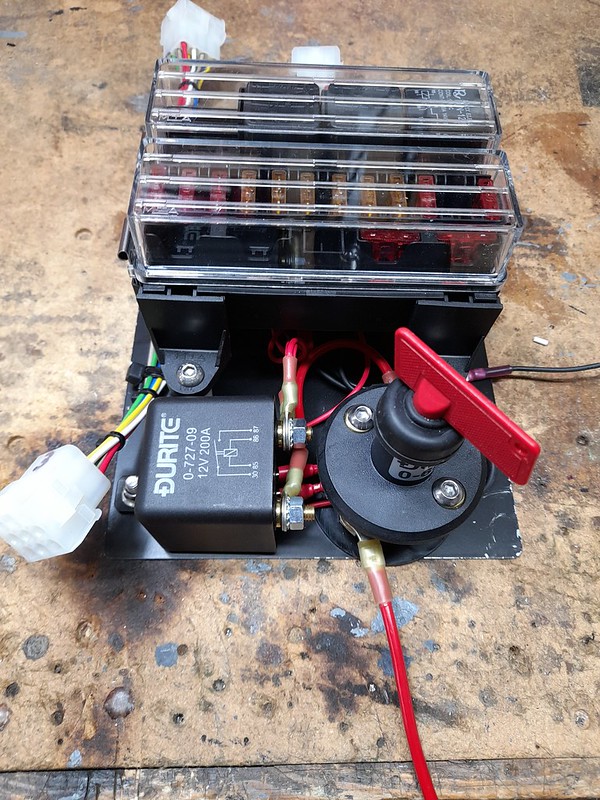
I have taken the opportunity of the last few mild days to complete the fusebox and battery box. The 3 connectors you can see are for the dashboard and rear loom. 2 other connectors appear the other side of the bulkhead, 1 for the engine and the other for the front lights etc. I have used industrial mate'n'lock connectors mainly as I had a load left over from the Pembleton build.
The ignition switch I have chosen is a fancy, key operated, industrial job but only has a low switching capability hence the large relay.
And of course the inevitable isolation switch.
For safety, as the battery in in the footwell rather than being under the bonnet, I have fitted two large fuses to the battery box, 1 for the starter (125 Amps) and the other for everything else (40 Amps).
Just need the actual battery now!
 fusebox by Robin Martin, on Flickr
 fusebox_mounted by Robin Martin, on Flickr
Next step will be the dashboard....Leave a comment:
-
I have a handbrake! And it works :-)
 handbrake 1 by Robin Martin, on Flickr
I have to say that the trigger handbrakes are beautifully made and, as a bonus, you get to deal directly with the famous Richard Oakes.
The handbrake cable from the Marina is the first I have ever seen with a built in grease nipple. You can just about see it on the centre right of the picture.
 handbrake2 by Robin Martin, on Flickr
Leave a comment:
-
Thanks for the comments guys.
I haven't decided on how to fix the top panel yet. I have made it in three pieces so my thinking was to pop rivet some of it and use rivnuts on the bit it would be handy to remove for access.
Cheers, Robin
Leave a comment:


Leave a comment: